Tutorial 2.2
Adding a named Site
This tutorial demonstrates how to add a named Site (for example, one where you regularly watch wildlife) to your FieldNotes database.
Adding details of your favourite sites will speed up recording and also provide more environmental context to your wildlife observations.
Before starting you will need to know ...
-
The Site name (either the local name or your own)
It is also be useful to know:
-
Where it is - the OS grid reference
-
Which county the Site is in
This tutorial assumes that FieldNotes software has already been installed and setup on your computer (see previous tutorials for help on installation and setup).
Familiarising yourself the 'New Site' form
The 'New Site' form will be used extensively for adding information to your
FieldNotes database.
If you wish to explore the various data-entry methods and associated controls/tools, follow the tutorial steps below in your own copy of
FieldNotes - when you have completed the tutorial simply select the
Cancel button instead of the
OK button to discard any data you have entered on the form (the database contents will remain unchanged).
Preliminary Steps in adding a Wildlife Site
Adding a new wildlife Site to your database is a straightforward process that involves completing a handful of fields in a single form.
Open the 'New Site' form
The quickest way of opening the 'New Site' form is to ensure that the record-type selector is set to Sites, and select the Add button on the main toolbar.
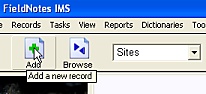
Open the 'New Site' form
by selecting:
Sites, then
the
Add button.
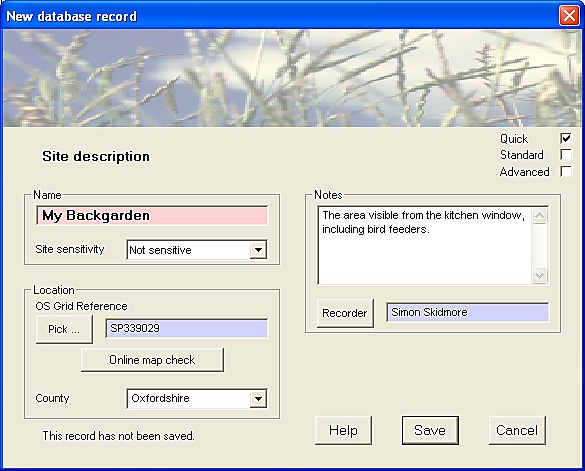
The 'New Site' form is displayed, containing a number of fields used to record a new wildlife Site.
Certain field values are initialised with values based on the current session.
The 'New Site' form
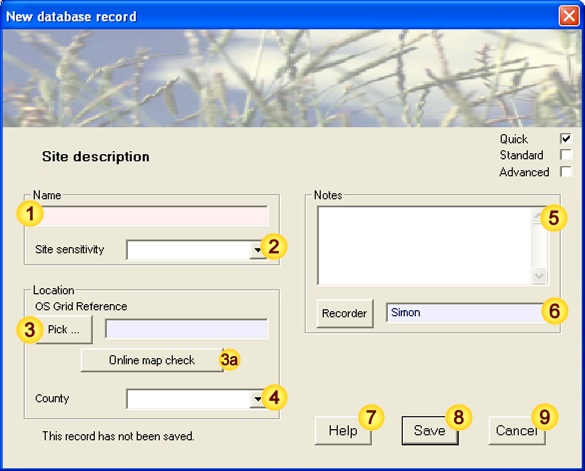 Input data fields
| Field | Notes |
| (Site) Name | Your unique name for this site |
| Record Sensitivity | Site Sensitivity assessment |
| OS Grid Reference | Relevant OS grid reference |
| Online map check | Check OS grid reference using online map resources |
| County | County in which theis Site resides |
| Notes | Additional notes |
| Recorder | Recorder name |
|
| Help | Field-content information |
| Save | Save data as new record |
| Cancel | Cancel the form |
Again, note that several fields have a pastel background - either pale red ("Site name") or pale blue ("OS Grid Reference", "Recorder").
The background colour indicates how important it is to provide data for a particular field - mandatory fields are essential for creating a valid record, whilst advisory fields provide important or useful information for subsequent processing.
In general it is good practice to provide as much information (ie. complete as many fields) as possible.
Preliminary - check the level-of-detail
Check that the level-of-detail (displayed on the right-hand edge of the form title) is set to 'Quick'. If it is not, select the appropriate checkbox.
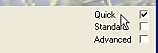
Setting the level-of-detail
checkbox to 'Quick'
[applies to most forms]
In this case level-of-detail affects the number of input fields displayed in a form.
The relevant Help library pages contain more detailed information about using level-of-detail.
Steps in adding a Wildlife Site
Sections 1-7 below describe the steps in completing the 'New Site' form from scratch.
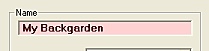
Choose a Site name
Type the name you have chosen for this site in the "Name" field.
The Site name must be unique
to your
FieldNotes database.
Site names may contain any combination of letters, numbers, spaces and punctuation - you can use existing place names (eg. Kynance Pool), descriptive names (eg. My Bird Table) or a naming scheme of your own (eg. Esth1.1).
Assign a Sensitivity to this Site
Site Sensitivity is a rough measure of how sensitive (at risk of disturbance) or unusual a site is; in most cases the two are fairly closely related.
If your Site is representative of a relatively common habitat type, for example, a garden or field, it's sensitivity is likely to be low and you may even ignore this field.
However if your Site is representative of a more unusual (or declining) habitat type, or one that is sensitive to disturbance, for example, a hedgerow or sandy heathland site, you should consider setting the Site Sensitivity value rather higher.
These settings will allow you to withhold details for sensitive sites when creating reports and selecting datasets for export.
Further information on relevant settings is provided in the Site form Help page.
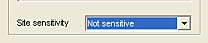
Setting Site sensitivity -
this field allows you to restrict
information for important sites.
During Site data-entry, FieldNotes will provide appropriate warnings if threatened (BAP Priority) habitat types are recorded with an inappropriately low sensitivity value.
Why assess Site Sensitivity?
The significance the Site Sensitivity field will become clearer as you start sharing your data with other recorders / Wildlife recording schemes, when it allows you to quickly select a suitable subset of records based on importance.
Wildlife observations associated with Priority Habitats are also of particular value to local and national record centres as they can affect planning and development decisions. (The UK Government has an obligation to protect our most important natural and semi-natural habitats, and records from such areas provide information about their health.)
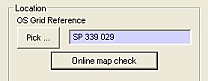
3. Enter the Ordnance Survey Grid Reference for this Site
In order to identify the Site location precisely you must provide an Ordnance Survey grid reference.
You may be able to find this in a report or description of the area, by using a hand-held GPS unit (which are now included in many mobile phones), or from a large-scale map.
If you are unsure of the OS grid reference but know the location, there are several ways of looking it up:
-
If you have a copy of the relevant OS map (large-scale, eg. ExplorerTM), the FieldNotes Hints pages include a description of how to lookup the OS grid reference from the map.
-
If you have an internet connection, tools for looking up an OS grid reference using online mapping resources can be found at UK Grid Reference Finder.
Any OS grid reference from 6-figure (100m-square precision) to 10-figure (1m-square precision) precision can be used.
Many GPS units and online mapping resources provide eight-figure (10m-square precision) or ten-figure (1m-square precision) OS grid references, which can be used without modification.
Specifying the OS grid reference -
spaces may be used to separate
components if preferred.
If you have purchased copies of the Ordnance Survey 1:50,000 Map Tiles (or an equivalent product), selecting the Pick button (left of the "OS Grid Reference" field) will provide a map interface in which you can load the relevant background map tile(s) and select the Site location using the cursor location.
More information on using the map-picking interface is given in subsequent tutorials.
Using online maps to check an OS grid reference
If you have an open internet connection, you may wish to confirm that the OS Grid Reference that you have supplied is correct.
Pressing the
Online map check button (immediately below the "OS Grid Reference" field) will display the relevant location in your browser using an online mapping resource (eg.
Google maps,
Bing maps,
Streetmap etc.).
The default online mapping resource may be specified using the application user-preferences () dialog.
4. Enter the County name
Select the county in which the site is located from the drop-down list.
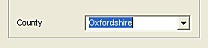
Setting the County name.
County data may be used as a coarse screening tool, and also as an approximate check for valid grid coordinates.
5. Add relevant notes about this Site
The 'Notes' field is free-text format - you may enter as little or much additional information as you like.
For example, you may wish to include notes on how to find the site, how best to approach it or the best time to visit.
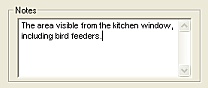
Add relevant notes for this Site
The 'Notes' field will automatically scroll to provide more space for your entry if required.
Alternatively double-click anywhere on the field to use a larger data-entry form.
6. Confirm that the Recorder name is correct
For convenience, the "Recorder" field is preset with the current FieldNotes user.
However if this Site description was provided by someone else, you may prefer to include their name in this field instead.
To update the field contents, either:
6(i). Simply delete the existing value and type in the name of the person who described this Site:
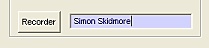
Updating Recorder name directly
6(ii). Alternatively, use the Recorder button to view a list of recorders entered into the database.
Selecting a Recorder from the list of recorder records:
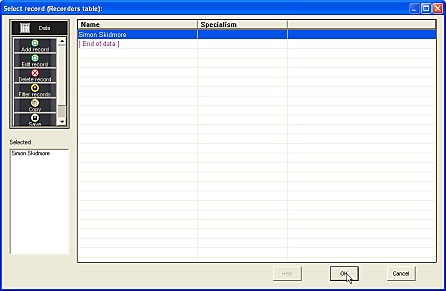
Pick the appropriate recorder name (by double-clicking - this will add the name to the 'Selected' list on the left-hand side of the form), then press the OK button to enter this value into the relevant field on the 'New Site' form.
Review the data you have entered
Take a moment to check that the data you have entered is correct, and agrees with your field notebook information.
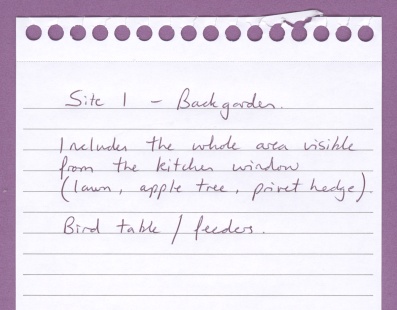
The 'New Site' form - completed
Field notebook entry
Its never too late to change your mind!
You may change any of the data you have entered in this record (or even delete it completely) later if you subsequently decide that it is incorrect, so saving the record is not a point of no return.
(Details of how to edit existing data are provided in a subsequent tutorial.)
If you are unsure about any of the data you have entered, the
Help button provides more information about acceptable field contents.
8. Save this record to the database
Pressing the Save button will save the information you have entered as a new database record.
Before the information is saved, however, FieldNotes will carry out a number of internal consistency checks on the values you have entered, and warn you if changes are required (eg. if the Site date is invalid or ambiguous) or desirable (eg. if advisory fields that have not been completed).
If error or warning messages are generated, you will have the opportunity to correct the values you have entered before the record is saved.
Your Site information is now saved as a record in the database.
Later tutorials will show you how to create reports and plot maps referencing your wildlife Sites.
Errors and Warnings generated by the 'New Site' form
| Error / Warning Message |
Cause |
| Error | <Site Name> field must be given a value | The 'Site Name' field has not been completed. |
| Error | <Site Name> value duplicates an existing record | The Site name is identical to an existing record. |
| Error | <OS grid reference> field must be given a value | The 'OS grid reference' field has not been completed. |
| Warning | <OS grid reference> is not a valid OS Grid reference | The OS Grid reference value is not valid. |
| Warning | <Recorder> does not match any existing records | The Recorder name does not match any known Recorders in the FieldNotes database. |
See relevant sections above for details of valid values.
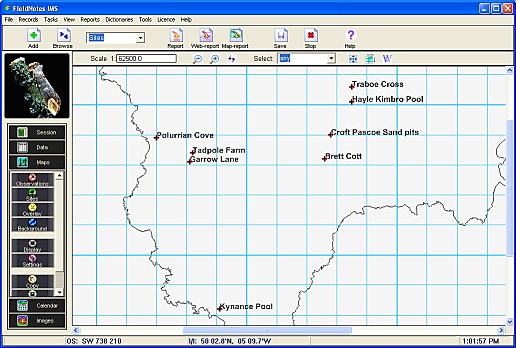
To display a map of Sites that you have entered into the database ...
You can create a map of all wildlife Sites currently entered in the FieldNotes database using the following three steps:
Set the record-type selector (on the Toolbar) to Sites then select the Data taskbar button - a list of all Site records will be displayed in the data-view window.
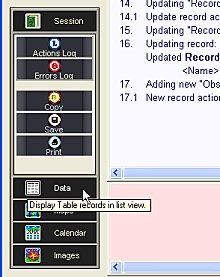
Data mode -
select the
Data button
on the Taskbar.
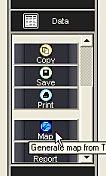
Select the
Map button
from the Data sub-tasks.
(This is the 7th sub-task button
from the top - you may have to
scroll down the sub-tasks to see it.)
A map containing all current Site records is displayed in the map-view window.
You may wish to add background maps (OS Map Tiles, VC boundaries, etc) to increase contextual relevance - details of how to do this are provided in later tutorials.
Site records [Map view]