Tutorial 1.1
Installing FieldNotes on your Computer
This tutorial contains guidance and additional information to help install FieldNotes on your computer.
Before starting, you will need ...
-
a copy of the FieldNotes installer program - either on CD or downloaded from the FieldNotes website
Optionally you may wish to choose:
-
where to install FieldNotes (destination folder) on your computer
-
how you want FieldNotes to appear in the start menu
-
whether you want to create a FieldNotes desktop icon
However accepting the default options will install FieldNotes correctly on all supported operating systems.
This tutorial assumes that you have have read the relevant product information on the FieldNotes website (http://www.fieldnotes.co.uk/), have decided to use FieldNotes software to record wildlife and environmental information on your computer, and are ready to install the software for use.
Please close all other applications before installing the software.
Installing FieldNotes
FieldNotes uses a 'wizard' (a set of sequential dialog screens) to simplify installation.
The five dialogs displayed during FieldNotes installation are described below, together with information about content and input fields.
To avoid switching constantly between your web-browser and the FieldNotes software, you may prefer to print the tutorial for easy reference.
Tip - cancelling the installation wizard
If you wish to stop and check information (or you are interrupted) while installing
FieldNotes, you can cancel the installer at any point up to and including the Summary step (page 5).
In this case the installation wizard will start from the beginning when next run.
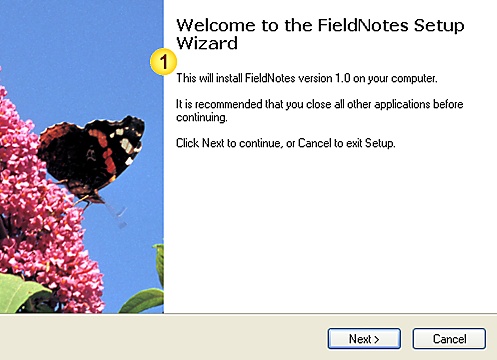
1. FieldNotes Installation - Introduction
The first page of the installation Wizard summarises the FieldNotes installation process.
FieldNotes Installer - Introduction [Page 1]
 Input data fields
| Field | Notes |
| Installation information | A brief description of the application
installer, including FieldNotes version
(see note below). |
1.1 Version information
Before continuing to install FieldNotes on your computer, you may wish to check the software version information (http://www.fieldnotes.co.uk/product/versions/) on the FieldNotes website to ensure that you are installing the most recent version of the software.
2. FieldNotes Installation - Target folder
The second page of the installation Wizard allows you to select an appropriate location for the software on your computer.
FieldNotes Installer - Target folder [Page 2]
 Input data fields
| Field | Notes |
| Installation folder | The path where the software will
be installed |
| Disc space required | The amount of free space required
on your computer's hard-drive
to install the software. |
2.1 Target folder location
The preferred location for installing new programs varies on different versions of Windows.
The installer will choose the correct location for the version of Windows on your computer - in some cases the folder path may differ slightly from that shown.
2.2 Disc space requirements
Modern computers are invariably equipped with one or more large hard-drives, and disc space is rarely an issue.
However if you are short of disc space, this statistic will allow you to check that you are not approaching capacity.
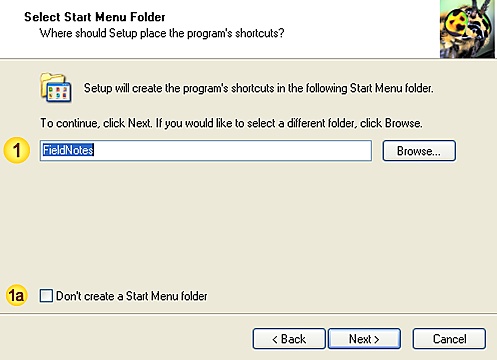
3. FieldNotes Installation - Start menu options
The third page of the installation Wizard allows you to choose which start menu icons will be created.
FieldNotes Installer - Start menu [Page 3]
 Input data fields
| Field | Notes |
| Start menu folder name | Software identifier within the Start menu. |
| Don't create a start menu folder | No start menu folder required. |
When FieldNotes is installed on your computer, a corresponding entry will appear in the Start menu (accessed from the 'Start' button at the lower left-hand side of the screen) with a shortcut to the program and the uninstaller script.
The usual name for the folder (menu item) in which these two shortcuts are displayed on the start menu is FieldNotes, however this dialog allows you to change this name if you prefer.
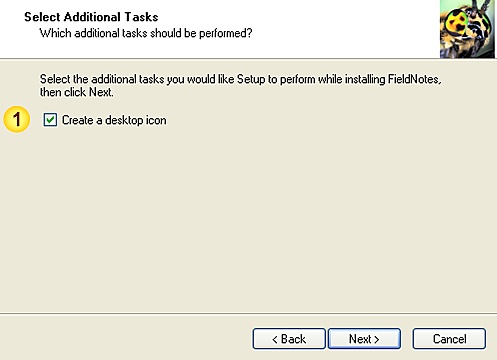
4. FieldNotes Installation - Additional tasks
The fourth page of the installation Wizard allows you to choose which other program shortcuts will be created.
FieldNotes Installer - Additional tasks [Page 4]
 Input data fields
| Field | Notes |
| Desktop icon | The installer will create one additional shortcut icon,
allowing you to start FieldNotes from your desktop. |
4.1. Create a Desktop icon (shortcut)
Whether you prefer to start your most frequently-used programs by clicking on a desktop icon or by selecting them from the start menu is a matter of personal choice.
If you keep shortcuts to all your favourite programs on the desktop, you should leave the 'Desktop icon' checkbox ticked.
Alternatively, if you prefer to keep the desktop free of clutter (perhaps to emphasise outstanding jobs) you should clear the checkbox.
You may of course delete the desktop icon at any later point without affecting the software.
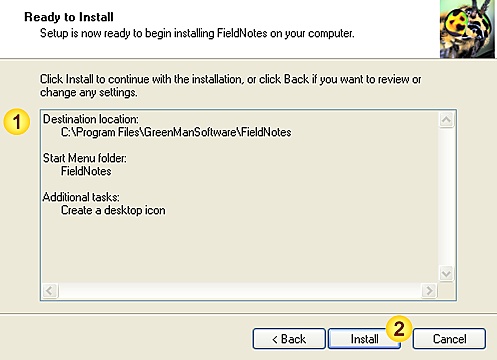
5. FieldNotes - Installation Summary
The final page of the installation Wizard displays a brief summary of your settings, before installing the software onto the computer.
FieldNotes Installer - Summary [Page 5]
 Input data fields
| Field | Notes |
| Installation Summary | A brief description of the
installation settings. |
| Install button | Start the installation. |
Tip - starting again
If you are unsure about the installation settings for any reason, you can either use the 'Back' button to change your settings or the 'Cancel' button to exit the installation without affecting your computer.
The installer will start from the beginning when next run.
6. FieldNotes - Post-installation options
The final page of the setup Wizard confirms that the software has been installed successfully and provides several post-installation options for exploring your new software.
FieldNotes Installer - Post-installation options
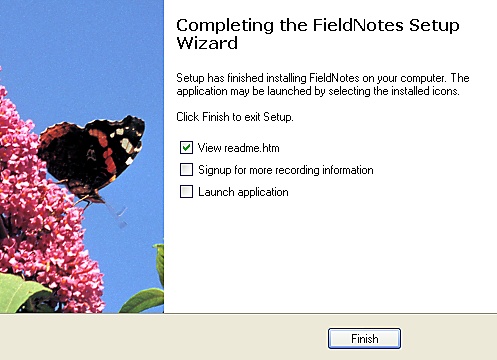 Getting started:
- view relevant documentation,
- signup to the FieldNotes wildlife
recording network (web-page link) - start using FieldNotes straight away.
|
6.1 View the README file
The README file contains a wealth of information about the software, associated files and resources that should give you a quick feel for where everything is.
As there is a lot more information than can be taken in quickly, a copy is also provided on the FieldNotes website for reference (http://www.fieldnotes.co.uk/notices/).
6.2 Signup for more recording information
FieldNotes Wildlife Recording Network (WRN) provides a forum for the exchange of ideas, information and resources relating both to wildlife observations and recording issues.
Membership is free, and information exchange encouraged using a variety of methods and formats.
If you wish to signup to the Wildlife Recording Network sometime later, an option is available in FieldNotes Help menu.
6.3 Launch FieldNotes
Start FieldNotes and explore the environment around you!
Finish
Select the 'Finish' button to end the installation.
Notes:
If you encounter difficulties when installing FieldNotes, check each step against this tutorial to identify and correct errors or omissions.
The FieldNotes 'Answers' documentation includes compilations of Frequently-asked Questions (FAQs) which may include similar or identical issues - it is worth checking if a solution or workaround is given here.
If you continue to have problems installing the software, email FieldNotes support - contact details are provided on the website (http://www.fieldnotes.co.uk/contact/)
Please ensure that you include the following information:
-
Which Operating system you are using (as much detail as possible, eg. XP Professional Version 2002 SP3);
-
What installation settings (Folder, etc) you were using, and;
-
What went wrong (including relevant error and warning messages).
If you use our online contact form, don't forget to include your contact details!
Tip - how to look up your Operating System version
In Windows, details of the current Operating system can usually be found in the Control Panel, by selecting the 'System' tool - OS version details are displayed on the 'General' tab.
Using FieldNotes
Congratulations, you have successfully installed FieldNotes recording software.
Before you can start adding your wildlife observations you will need to set up the database - this quick and easy process is described in the next tutorial Tutorial 1.2 - Setting up your FieldNotes database for use.
The tutorial is displayed during the setup procedure.