Tutorial 1.2
Setting up your FieldNotes database
This tutorial contains guidance and additional information to help set up the FieldNotes database.
Before starting, you will need to know ...
-
the type of licence you require (information provided below).
-
the folder (file-location) where you want to store the database files
-
optional information describing your database (eg. title and description)
This tutorial assumes that FieldNotes software has already been installed on your computer (see previous tutorial for help on installation).
Setting up the database
FieldNotes uses a 'wizard' (a set of sequential dialog screens) to simplify the process of setting up the database.
The five dialogs displayed during FieldNotes setup are described below, together with information about content and input fields.
To avoid switching constantly between your web-browser and the FieldNotes software, you may prefer to print the tutorial for easy reference.
Tip - cancelling the setup wizard
If you wish to stop and check information (or you are interrupted) while setting up the database, you can cancel the FieldNotes setup wizard at any point until the database is created (final step - page 5).
In this case the setup wizard will simply run again when the software is next started.
The setup process is very easy - infact its mostly done "behind the scenes" in response to a simple set of requirements provided by you.
In most cases the default options will provide a perfectly good software installation on your computer, the main exception being the location of the database files (which depends if you want to share access or not).
Selecting the Next> button in each form will display a message box if a required input is missing.
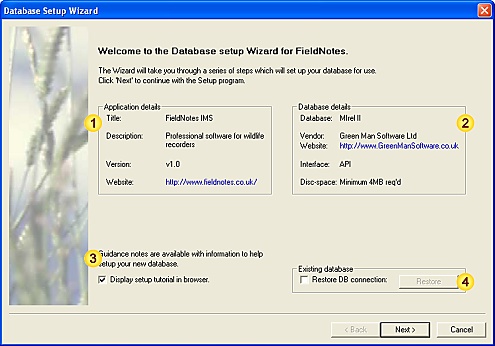
1. FieldNotes setup - Introduction
The first page of the setup Wizard simply gives an overview of the application details (version, etc) and hardware requirements.
Setup Wizard - Introduction [Page 1]
 Input data fields
| Field | Notes |
| Application information | Brief details, including
link to website. |
| Database information | Implementation / connectivity. |
| Help | View this setup tutorial. |
| Restore DB connection | Ignore |
1.1 Help
The "Guidance notes" checkbox displays this document using your default HTML web-browser.
1.2 Existing database
The "Restore DB Connection" checkbox / button can safely be ignored when creating a new database.
This facility is available for existing users who are migrating their database to a new computer, or have lost registry settings.
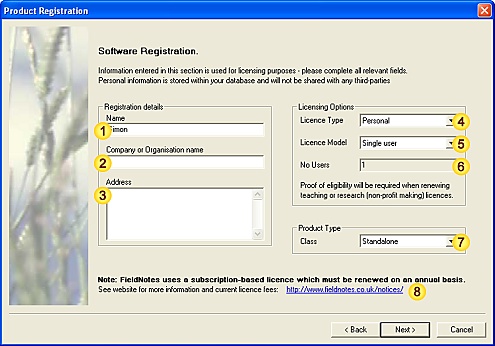
2. FieldNotes setup - Product registration
The second page of the setup Wizard contains a number of fields for entering database registration details and specifying licence requirements.
Setup Wizard - Product registration [Page 2]
 Input data fields
| Field | Notes |
| Software owner | Mandatory |
| Company name | Optional |
| Address | Any non-blank content |
| Licence type | See notes below |
| Licence model | Invariable |
| Number of users | Invariable |
| Product class | Invariable |
| Webpage
[Hyperlink] | Licensing Information, including fees |
2.1 Registration details
The software registration information (owner, company, address) is stored in the database and used when generating titles / headers for reports,
for exporting data and for generating license-application requests.
Any personal information you choose to provide is not checked - you may use a pseudonym if you prefer to remain anonymous.
2.2 Licensing options
A number of different licence types are available for FieldNotes, depending on the circumstances in which it is used.
These relate predominantly to:
-
the environment in which the software is used; and,
-
the location and ownership of the computer on which it is installed.
| Licence type | Restrictions |
| Teaching | Teaching resource - Schools, Colleges and Universities |
| Personal | Private use by individuals |
| Research | Research tool; generally non-profitmaking associations and organisations |
| Commercial | None |
This flexible licensing approach is designed to make the software affordable to all users.
If you are unsure which licence type you require, please contact Green Man Software Ltd via the website Contact form for more information.
2.3 Product type
FieldNotes is currently available only as a standalone application (pre-selected in the product-class field).
2.4 Licence Information
This link (opens in your browser) will display the FieldNotes licensing website page, which contains further information about licence types, requirements and fees.
Additional Notes
Please note that FieldNotes IMS is licensed on a subscription basis, which is renewable annually for as long as you continue to use the software.
The annual subscription cost depends on the licence type - please see the relevant FieldNotes webpage
(http://www.fieldnotes.co.uk/notices/fees.htm) for current prices.
The licence fee includes software and resource updates and limited technical support for the relevant period.
The Licence period (including any free trial) starts when you first set up the database - not from the software installation time
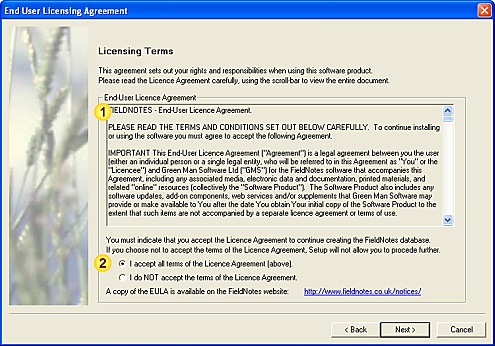
3. FieldNotes setup - Licensing agreement
The third page of the setup Wizard contains the End User Licensing Agreement (EULA).
It is important that you read and agree to the licensing terms before using this software.
Setup Wizard - EULA [Page 3]
 Input data fields
| Field | Notes |
| EULA document | End-user Licensing Agreement -
please ensure that you read all terms and conditions. |
| EULA agreement | Mandatory |
A copy of this agreement is also available on the FieldNotes website (http://www.fieldnotes.co.uk/notices/).
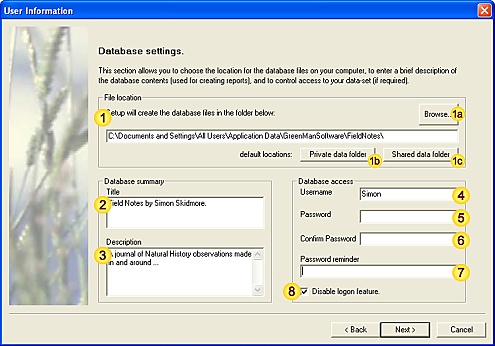
4. FieldNotes setup - Database settings
The fourth page of the setup Wizard collects data for database initialisation.
Setup Wizard - Database Settings [Page 4]
 Input data fields
| Field | Notes |
| File location | Folder where database files will be created. |
| Browse | Select folder for database files. |
| Private data | Use the default private data folder on your computer for database files. |
| Shared data | Use the default shared data folder on your computer for database files. |
| Database title | Optional [preset value supplied]. |
| Database description | Optional [preset value supplied]. |
| Username | Mandatory; see notes |
| Password | Mandatory; see notes |
| Confirm password | Mandatory; must match field exactly. |
| Password reminder | Optional; see notes |
| Disable logon | See notes below |
There are three sections containing fields for user-input:
4a. File location
This is the location where the database files will be stored - it should point to a folder on a local (ie. not networked) drive with at least 4MB free space.
Once the database has been created you do not need to remember where the files reside on your computer; the location will be stored in the software.
Default locations used for database files:
-
Private - only you will have the correct permissions to access the FieldNotes database.
-
Shared - other users on the computer may use the FieldNotes database.
4b. Database summary
This section allows a title and brief description of the database to be stored.
These fields may be used to provide summary information about the database when creating reports and exporting records, so should be descriptive if possible.
Both fields are optional.
4c. Database access
These fields allow a username and password to be stored, which may be used to restrict access to the database (if required).
If the logon feature is enabled, users will be prompted for a username / password when starting FieldNotes and also when resuming a session if the application has been locked.
Tip - keep a secret copy of your FieldNotes username and password
If you use the logon feature, be sure to keep a copy of your logon details somewhere safe.
Username and password data are stored in a highly encrypted form, and we are unable to recover them for you if they are lost or forgotten.
The logon feature can be enabled / disabled later selecting the "Tools | Options..." menu option in FieldNotes.
5. FieldNotes setup - Summary and database creation
The final page of the setup Wizard provides a brief summary of your settings, before creating the database.
Setup Wizard - Summary [Page 5]
 Input data fields
| Field | Notes |
| Create | Create the database |
| Setup Summary | A brief description of the new database settings. |
| Data Summary | Imported data modules. |
| Tutorials | Display FieldNotes tutorials. |
5.1 Create the database
Creates a new FieldNotes database using relevant settings from the setup wizard.
There are two main steps; creation of the database files, and loading a number of default data entries (for example, checklists, details of relevant organisations).
After the database has been successfully created the following message is displayed on the dialog:
The Wizard has successfully setup your FieldNotes database for use.
Click "Finish" to exit the Wizard.
At the same time the Finish button will be enabled, allowing you to exit the setup wizard and start recording your observations.
5.2 Display FieldNotes tutorials
The FieldNotes tutorials option is only enabled after the database has been created.
If the 'display' checkbox is selected, a list of introductory tutorials are displayed using your default HTML web-browser when the setup wizard is closed.
These provide a useful starting point for many common tasks, showing how to enter and save your observations and explore different features of the software.
Tip - starting again
If you are unhappy with your database settings for any reason, you can delete your
FieldNotes database by selecting the menu option.
Note that any data you have added to the database will be lost!
The database setup wizard will simply run again when the software is next started.
Notes:
If you encounter difficulties when creating your FieldNotes database, check each step against this tutorial to identify and correct errors or omissions.
FieldNotes writes errors and warnings to a log-file (named 'errors.log') which is located in the 'logs' folder in the application directory - this may indicate at which stage in the process the errors occurred.
Tip - locating the FieldNotes application folder
To find the
FieldNotes application folder (ie. the directory where it was installed):
-
right-click on the FieldNotes icon and select 'properties'
-
on the 'shortcut' tab, select the Find Target button.
(The default
FieldNotes application folder is generally something like "C:\Program Files\GreenManSoftware\FieldNotes".)
The FieldNotes 'Answers' documentation includes compilations of Frequently-asked Questions (FAQs) which may include similar or identical issues - it is worth checking if a solution or workaround is given here.
If you continue to have problems creating the database, email FieldNotes support - contact details are provided in the 'About' dialog (accessed using the menu option in FieldNotes).
Please ensure that you include the following information:
-
Which Operating system you are using (as much detail as possible, eg. XP Professional Version 2002 SP3);
-
What database settings (Licence type, etc) you were using, and;
-
What went wrong (including relevant error and warning messages).
Please attach the relevant error log-file if possible.
If you use our online contact form, don't forget to include your contact details!
Tip - how to look up your Operating System version
In Windows, details of the current Operating system can usually be found in the Control Panel, by selecting the 'System' tool - OS version details are displayed on the 'General' tab.
Using FieldNotes
Congratulations, you have successfully set up your own FieldNotes database.
Now you can store your wildlife observations efficiently, generate maps, reports and web-pages, share species information and much, much more!
For new users, a selection of introductory tutorials is available as part of the FieldNotes documentation; these may be displayed from within the software at any time:
Accessing FieldNotes tutorials
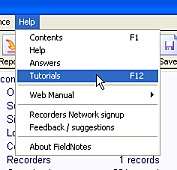
The full list of tutorials is
available from within FieldNotes
via the "Help | Tutorials" menu.
Tip - backing up your work.
Remember to make regular backup copies of all your personal database files to external media (CD, external drive, data repository), in order to avoid losing data in the event of hardware failures or viruses.