Tutorial 2.1
Adding a new wildlife Observation
(location as OS Grid ref.)
This tutorial demonstrates how to add a single wildlife observation (plant / animal / fungus, etc) to your FieldNotes database, using an OS Grid reference to specify where you saw it.
This is the only procedure that you will need to learn to compile a database of your own wildlife observations.
However, the other tutorials will help you to speed up the process of data-entry, assist you in generating reports, maps and exportable files, and generally allow you to get much more from your FieldNotes software.
Before starting you will need to know ...
-
What you saw - the common or scientific (latin) name
-
When you saw it - the date (and optionally time)
-
Where you saw it - the OS grid reference
(or place name and an appropriate OS map).
This tutorial assumes that FieldNotes software has already been installed and setup on your computer (see previous tutorials for help on installation and setup).
Familiarising yourself the 'New Observation' form
The 'New Observation' form will be used extensively for adding information to your
FieldNotes database.
If you wish to explore the various data-entry methods and associated controls/tools, follow the tutorial steps below in your own copy of
FieldNotes - when you have completed the tutorial simply select the
Cancel button instead of the
OK button to discard any data you have entered on the form (the database contents will remain unchanged).
Preliminary Steps in adding a Wildlife Observation
Adding a new wildlife Observation to your database is a straightforward process that involves completing a handful of fields in a single form (described below).
The preliminary steps below show how to select the appropriate form (also known as a dialog) from within FieldNotes.
Preliminary - set the level-of-detail
A key feature of FieldNotes is that wildlife Observations (and other records) may be entered with varying levels-of-detail ('Quick', 'Standard' or 'Advanced'), depending how much information is available, what sort of records are required and your personal preferences.
Introductory tutorials use the 'Quick' level-of-detail for data-entry forms:
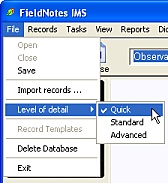
Before starting ensure that
form-detail, on the
menu, is set to "
Quick".
The level-of-detail affects the number of input fields displayed in a form:
-
'Quick' - contains only essential record information;
-
'Standard' - includes all relevant record information, and;
-
'Advanced' - includes a number of more detailed fields (some of which may require specialised knowledge).
The relevant Help library pages contain more detailed information about using level-of-detail.
Open the 'New Observation' form
The quickest way of opening the 'New Observation' form is to ensure that the record-type selector is set to Observations, and select the Add button on the main toolbar.
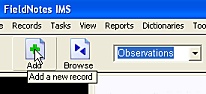
Opening the 'New Observation'
form by selecting:
Observations, then
the
Add button.
However there are often several alternative ways of opening forms in FieldNotes - you may find it more convenient use the menu and select , then .
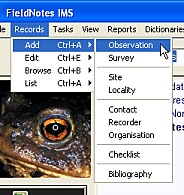
Opening the 'New Observation' form
directly from the menu.
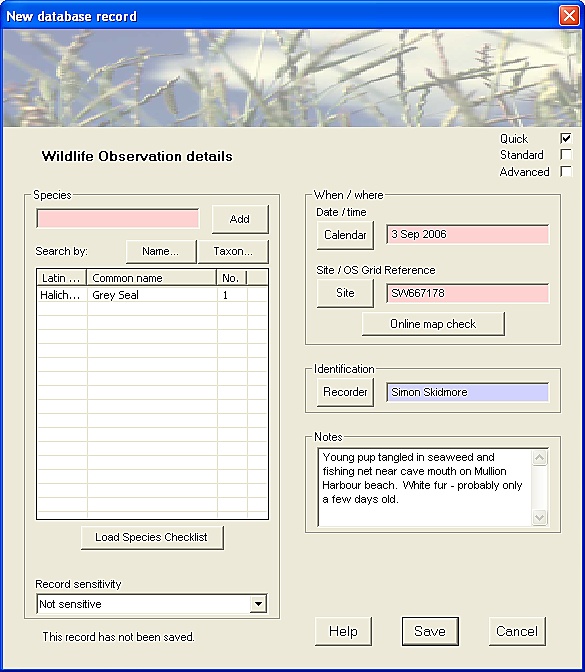
The 'New Observation' form is displayed, containing the fields used to record a new wildlife Observation.
Certain field values are initialised with values based on the current session.
The 'New Observation' form
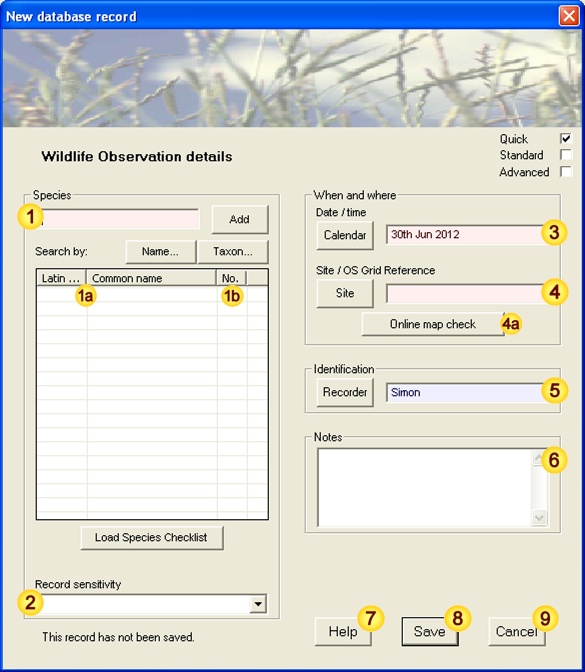 Input data fields
| Field | Notes |
| Species | Species name (common or latin name) |
| Species entry | (auto-generated from field ) |
| Abundance | No. of individuals seen |
| Record Sensitivity | Species Sensitivity assessment |
| Date / time | When the Observation was made |
| Location | Where the Observation was made |
| Recorder | Who made the Observation |
| Notes | Additional notes |
|
| Help | Field-content information |
| Save | Save data as new record |
| Cancel | Cancel the form |
Note that several fields have a pastel background - either pale red (eg. "Species", "Date / time", "Location" fields) or pale blue (eg. "Recorder" field).
The remaining fields have uncoloured (white) backgrounds. Background colours indicate how important it is to provide data for a particular field -
| Field colour | Significance |
| light red |
mandatory - must be completed |
| light blue |
advisory - should be completed if possible |
| white |
optional - complete as required |
Mandatory fields are essential for creating a valid record - for example, an Observation which has not been given any location has no value to either the recorder or recording organisations.
Advisory fields provide important or useful information for subsequent processing - for example, including the Recorder's name is important to prevent duplication when collating larger datasets.
In general it is good practice to provide as much information (ie. complete as many fields) as possible.
Steps in adding a Wildlife Observation
Sections 1-8 below describe the steps in completing the 'New Observation' form from scratch.
Select the Species name
Enter the species name in the field named "Species".
You can use a common name (Grey Seal) or the scientific name (Halichoerus grypus) as preferred.
After several letters have been entered, the auto-complete function will try to anticipate the species using the closest matching name from the Species database.
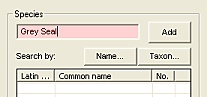
Enter the Common or Latin
name in the 'Species' field
Continue typing until the correct species name is displayed, then finish by pressing the Return key or use the adjacent Add button, either of which will add the species name to the species-data list (below the entry field).
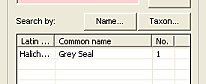
Species name added
to the Species-data list
Note that an abundance of 1 (ie. single species observation) is automatically entered into the relevant column.
Unrecognised species
If you are using this tutorial as a guide whilst adding your own wildlife observations, you may occasionally encounter unrecognised or unresolved species names.
See
Notes (below) for ways to uniquely identify the correct species name.
Enter number of individuals observed
The number of individuals observed (abundance) is automatically set to one when a new species is added to the list .
(This value is correct in the current case, and can be left unchanged.)
Where necessary you can update the abundance by double-clicking on the appropriate column in the species-data list (to the right of the species that you have entered), entering the number of individuals observed, then either press the return key or click anywhere else on the form to enter this value.
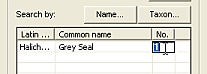
Set the number of individuals
in the species-data list
Assign a Sensitivity to this Record
Record Sensitivity is a rough measure of the importance of your the Observation, both in terms of the species itself (ie. emphasises unusual or rare species) and the context of the record (ie. den, nest).
This field becomes increasingly important when you start sharing your data with other recorders / Wildlife recording schemes, as it allows you to quickly select a suitable subset of records based on importance.
In this case the Observation has a low sensitivity, as this is not a priority species and furthermore it is unlikely that someone visiting the same spot would find a similar individual.
(Infact, for the majority of Observations this field can be safely ignored.)
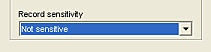
Setting record sensitivity.
Assessing Record Sensitivity
If your Observation includes a species at risk of disturbance (for example a rare flower or birds nest) you should set a high Record Sensitivity value to reflect the risk of interference.
These settings will allow you to withhold details for sensitive records when creating reports and selecting datasets for export.
When entering Observation data,
FieldNotes will provide appropriate warnings if protected (Red Data Book/BAP Priority) species are recorded with an inappropriately low sensitivity value.
Further information on relevant settings is provided in the
Observation form Help page.
The full list of BAP Priority species can be explored by selecting the menu option.
3. Enter the date when you made the observation
For convenience, the "Date" field is automatically preset to the current date. If this is not the date when you made the observation, then correct the displayed date using either of the two following methods:
3(i). Simply delete the existing value in the "Date" field and type in the correct date (and time if required).
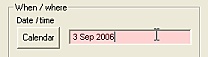
Updating the Observation
date directly
Any date format that is not ambiguous is acceptable, with few restrictions on separators; eg.
| Acceptable Date / Time data formats |
3 Sep 2006
3-Sep-2006
3:Sep:2006 | Valid | Unambiguous |
| 3rd September 2006 | Valid | Unambiguous |
| 3 Sep 2006 2:10:00 | Valid | Unambiguous |
| 3/9/2006 | Invalid | Day/Month order is ambiguous
[Note: 26/9/2006 is valid] |
| 3 Sep 06 | Invalid | Day/Year order is ambiguous
[Note: 3rd Sep 06 is valid] |
3(ii). Alternatively, press the adjacent Calendar button and select the correct date using the Calendar tool.
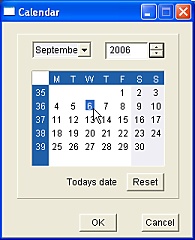
Selecting the
Observation date
using the Calendar tool
When you have chosen the appropriate day/month/year on the calendar, selecting OK will automatically transfer the value into the relevant field on the 'New Observation' form.
Enter the place where you made this observation
In order to identify the place where you made the observation uniquely, you should provide the appropriate Ordnance Survey grid reference.
This may be published in a relevant report or description of the area, obtained from a hand-held GPS unit (which are now included in many mobile phones), or worked out using a large-scale map.
If you are unsure of the OS grid reference but know the name of the location, there are several ways of looking it up:
-
If you have a copy of the relevant OS map (large-scale, eg. ExplorerTM), the FieldNotes Hints pages describe how to lookup the OS grid reference from the map.
-
If you have an internet connection, tools for looking up an OS grid reference using online resources can be found at the UK Grid Reference Finder web-site.
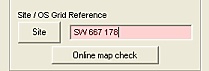
Specifying the location
using an OS grid reference -
spaces may be used to separate
components if preferred.
OS grid references are most usually given in six-figure format (eg. SW123123).
This level of precision, which resolves to a 100m-square on the ground, is easily read from large-scale (eg. OS Explorer TM) maps.
However the OS grid reference can be specified to other levels of precision - many GPS units and online mapping resources provide 8-figure (10m-square precision) or 10-figure (1m-square precision) OS grid references as standard.
A 4-figure grid reference (1km-square precision) may be sufficient for mobile species.
Using Online maps to check the locations
If you have an open internet connection, you can quickly confirm that the OS Grid Reference that you have supplied is correct.
Pressing the
Online map check button (immediately below the "Location" field) will automatically display the relevant location in your browser using one of the online mapping resources (eg. Google maps, Bing, Streetmap).
If you prefer to use an alternative online mapping resources, the default site may be specified using the application user-preferences () dialog.
5. Confirm that the Recorder name is correct
For convenience the "Recorder" field is automatically preset with the current FieldNotes user.
However if this observation was made by someone else, their name should be entered in this field instead.
To update the field contents, either:
5(i). Simply delete the existing value and type in the name of the person who made this observation:
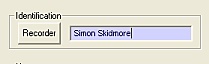
Updating the Recorder
name directly.
5(ii). Alternatively, use the Recorder button to view a list of recorders entered into the database:
Selecting a Recorder from the list of recorder records:

Select the appropriate recorder name (by double-clicking - this will add the name to the 'Selected' list on the left-hand side of the form), then press the OK button to enter this value into the relevant field on the 'New Observation' form.
Add relevant notes about this Observation
The 'Notes' field is free-text format - you may enter as little or much additional information as you like.
For example, you may wish to include notes on observed colour variations, size or behaviour.
As we have specified the location using just an OS Grid reference, it is useful to include some additional information about finding the site here, for future reference.
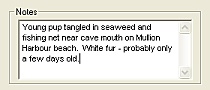
Add relevant notes
for this Observation
The 'Notes' field will automatically scroll to provide more space for your entry if required.
Alternatively double-click anywhere on the field to use a larger data-entry form.
Review the data you have entered
Take a moment to check that the data you have entered is correct, and agrees with your field notebook entry.
The 'New Observation' form - completed
Field notebook entry

Its never too late to change your mind!
You may change any of the data you have entered in this record (or even delete it completely) later if you subsequently decide that it is incorrect, so saving the record is not a point of no return.
(Details of how to edit existing data are provided in a subsequent tutorial.)
If you are unsure about any of the data you have entered, the
Help button provides more information about acceptable field contents.
8. Save this record to the database
Pressing the Save button will save the information you have entered as a new database record.
Before the information is saved, however, FieldNotes will carry out a number of internal consistency checks on the values you have entered, and warn you if changes are required (eg. if the Observation date is invalid or ambiguous) or desirable (eg. if advisory fields that have not been completed).
If error or warning messages are generated, you will have the opportunity to correct the values you have entered before the record is saved.
Your Observation information is now saved as a record in the database.
Later tutorials will show you how to create reports and plot maps based on your wildlife Observations.
Errors and Warnings generated by the 'New Observation' form
| Error / Warning Message |
Cause |
| Error | <Species> field must be given a value | The 'Species name' field has not been completed. |
| Error | <Date> field must be given a value | The 'Date' field has not been completed. |
| Error | <Location> field must be given a value | The 'Location' (OS grid reference) field has not been completed. |
| Error | <Date> invalid or ambiguous value | Date (and optionally time) has an invalid or ambiguous format. |
| Warning | <Record sensitivity> is inconsistent with the priority status of "species"
("species" is not a recognised Priority species.) | Record sensitivity may be set too high for this (non-priority) species. |
| Warning | <Record sensitivity> is inconsistent with the priority status of "species"
(This is a Priority Species - consider using "BAP priority species" or higher.) | Record sensitivity may be set too low for this (priority) species. |
| Warning | <Location> is not a valid Site name or OS Grid reference | The OS Grid reference value is not valid. |
| Warning | <Recorder> value does not match any existing records | The Recorder name does not match any Recorders in the FieldNotes database. |
See relevant sections above for details of valid values.
1. In some cases, a species cannot be uniquely identified from the species name that has been entered by the user. There are two main reasons for this:
-
Unrecognised Species names may occur as a result of mis-spelling the intended name, or from using an alternative (in some case local) name that is not included in the FieldNotes species database.
-
Unresolved Species names occur when two distinct species are commonly referred to by the same common name - for example, water boatman, cabbage white (where the common name may refer to several species); eyebright, hawkweed, bramble (where the common name is applied indiscriminately to a number of micro-species).
In both cases the relevant help topic provides guidance for establishing the correct species name.
Additional help topics describe techniques for Exploring the Species database and
Exploring the Taxon database, demonstrating alternative methods for uniquely identifying species.
Speeding up data entry
You can record two or more different species simultaneously, as long as they were both observed at the
same place and on the
same date (and time, if specified), and any relevant notes (step 5) are identical.
Repeat step 1 as many times as required to include the relevant species names in the species data list, and complete the other fields (steps 2-4) as above.
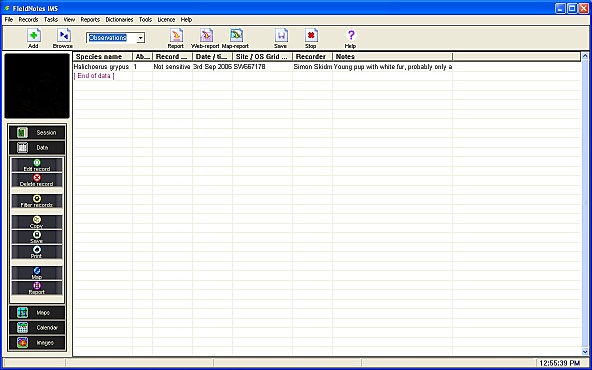
To list the Observations that you have entered into the database ...
If you wish to view all wildlife Observations currently entered in the FieldNotes database, set the record-type selector to Observations then select the Data taskbar button:
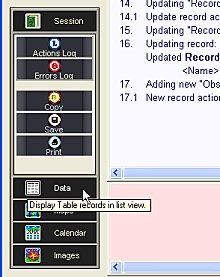
Select the
Data button
on the Taskbar (Data mode).
A list of all current 'Observation' records is displayed in the data-view window. The window may be scrolled up/down to view all records, and left/right to examine all fields for a specific record.
'Observations' records [Data view]