Tutorial 2.4
Updating an existing Record (Recorder details)
This tutorial demonstrates how to update (edit) an existing record - in this case your own Recorder details, which were automatically added to your FieldNotes database when it was created.
You may need to update records to correct information or add more detail.
Before starting you will need to know ...
-
Information about your own specialist areas / interests.
This tutorial assumes that FieldNotes software has already been installed and setup on your computer (see previous tutorials for help on installation and setup).
Editing a record
The procedure for selecting and updating a record applies to all tables in your
FieldNotes database.
If you wish to explore the process, follow the tutorial steps below in your own copy of
FieldNotes - when you have completed the tutorial simply select the
Cancel button instead of the
OK button to discard any data you have entered on the form (the database contents will remain unchanged).
Preliminary Steps in updating an existing Record (Recorder details)
Updating an existing record is a straightforward process that involves selecting the correct record and adding / amending information in the relevant fields.
Listing 'Recorder' records
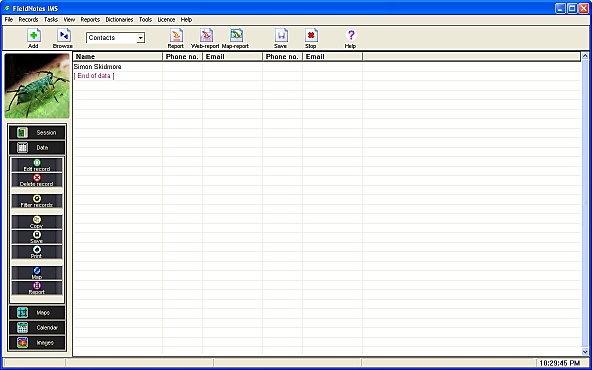
To view all Recorders currently entered in the FieldNotes database, set the record-type selector to Recorders then select the Data taskbar button:
Select the
Data button
on the Taskbar (Data mode).
A list of all current 'Recorder' records is displayed in the data-view window.
'Recorder' records [Data view]
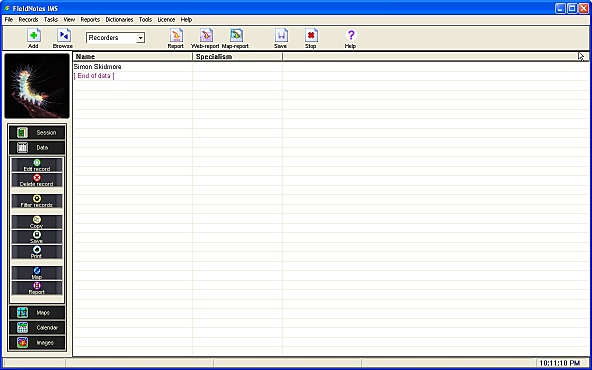
There is only a single record (row) and two fields (columns) in this case, as the database is fairly new.
(When more records are displayed, the window may be scrolled up/down and left/right to view all data.)
View the record data in the 'Recorder' form
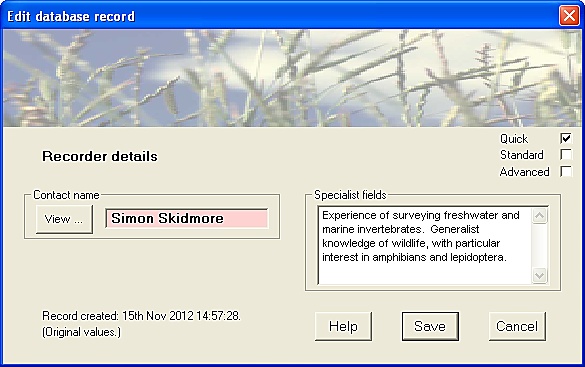
Double-click on the appropriate record (row): the 'Recorder' form is displayed with the previously-saved field values.
The 'Recorder' form - initial values
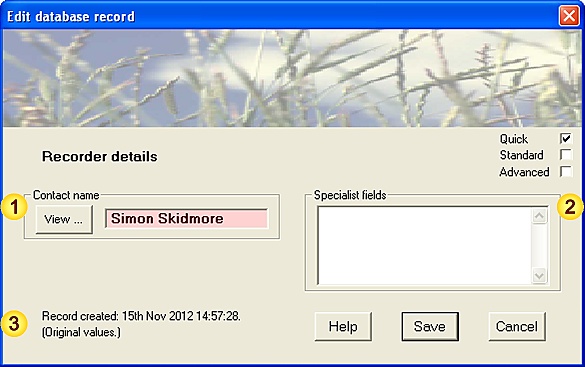 Input data fields
| Field | Notes |
| Name | Recorder name |
| Specialist fields | Areas of expertise |
| Update history | Date this record was created / last updated. |
In general it is good practice to provide as much information (ie. complete as many fields) as possible.
In this tutorial we will ensure that the 'Specialist fields' information is up-to-date with relevant areas of expertise.
Preliminary - check the level-of-detail
Check that the level-of-detail (displayed on the right-hand edge of the form title) is set to 'Quick'. If it is not, select the appropriate checkbox.
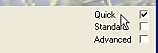
Setting the level-of-detail
checkbox to 'Quick'
[applies to most forms]
In this case level-of-detail affects the number of input fields displayed in a form.
The relevant Help library pages contain more detailed information about using level-of-detail.
Steps in updating an existing Record (Recorder details)
This section describes how to update the 'Recorder' form to include additional information.
Add information about your areas of expertise
The field for 'Specialist fields' information is currently empty.
This field has a free-text format - you may enter as little or much additional information as you like.
For example, you may wish to include information about particular groups that you are particularly interested in, expertise you have gained through previous surveys, or areas in which you would like to become involved in the future.
Wide-ranging knowledge is itself a specialism!
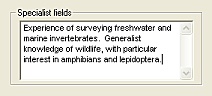
Add notes describing your expertise.
The field will automatically scroll
to provide more space if required.
Review the data you have entered
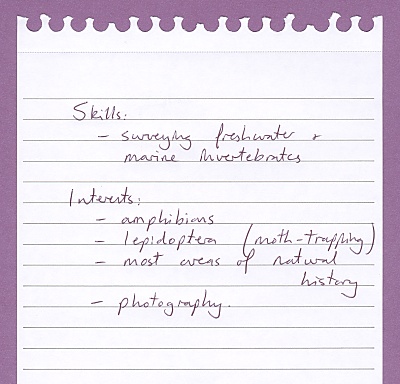
Take a moment to check that the data you have entered or amended is correct, and agrees with your field notebook information.
The 'Recorder' form - updated
Field notebook entry
Its never too late to change your mind!
You may change any of the data you have entered in this record (or even delete it completely) later if you subsequently decide that it is incorrect, so saving the record is not a point of no return.
(Details of how to edit existing data are provided in a subsequent tutorial.)
If you are unsure about any of the data you have entered, the
Help button provides more information about acceptable field contents.
3. Update this record in the database
Pressing the Save button will store the information you have entered by over-writing the original database record.
Before the information is saved, however, FieldNotes will carry out a number of internal consistency checks on the values you have entered, and warn you if changes are required or desirable (eg. if the Contact name is now empty, or invalid).
If error or warning messages are generated, you will have the opportunity to correct the values you have entered before the record is saved.
Your updated Recorder information is now saved in the database.
Errors and Warnings generated by the 'Recorder' form
| Error / Warning Message |
Cause |
| Error | <Name> field must be given a value | The 'Recorder' field has not been completed. |
| Warning | <Name> value does not match any existing records | The Recorder name does not match any Recorders in the FieldNotes database. |
To update the way that your Name appears in the Recorders table ...
In the FieldNotes database, 'Recorders' and 'Contacts' data are arranged in a hierarchial manner:
-
'Contacts' records are used to store information about people who are know through recording activities
-
'Recorders' are a specific subset of Contacts; the Recorder information is added to existing Contact details
As a consequence the 'Contact name' field in the 'Recorders' form should point to an existing 'Contacts' record with the same name.
The database will still work if it doesn't, but it will generate warnings to this effect that may become repetitive.
When the FieldNotes database is created the registered owner's name is used to initialise 'Contacts' and 'Recorders' records, as an aid to recording.
As a result, if you wish to update the way that your name appears in the either record, you should ensure that you update both record similarly.
Updating your name in the 'Contacts' table
To view Contacts records, set the record-type selector to Contacts then select the Data taskbar button:
A list of all current 'Contacts' records is displayed in the data-view window (in this case a single record).
'Contacts' records [Data view]
Double-click on the appropriate record: the 'Contacts' form is displayed with the previously-saved field values.
The 'Contact' form - initial values
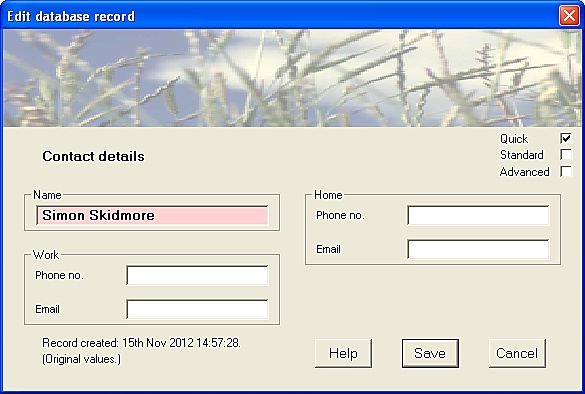
Update the 'Name' field by deleting the existing value and entering your name as you prefer it to appear.
(If you wish you may take this opportunity to complete some of the other fields.)
Selecting the Save button will store the updated information in your database.
Updating your name in the 'Recorders' table
To update the relevant field in the 'Recorders' table follow the preliminary steps of this tutorial to open the 'Recorder' form.
Then use either of the following methods to set the value correctly:
-
Simply type your name as you prefer it to appear into the 'Contact name' field.
It is important that the name exactly matches the name you have used in the 'Contacts' form.
-
Alternatively, use the View button to view a list of contacts entered into the database.
Then pick the appropriate contact name (by double-clicking - this will add the name to the 'Selected' list on the left-hand side of the form) and press the OK button to enter this value into the relevant field on the 'Recorder' form.
Again, use the Save button to store the updated information in your database.