Tutorial 3.3
Importing a Group of Recorders
This tutorial demonstrates how to add a number of new recorders (and their contact details) quickly by importing the list of names from a text file.
This process is useful if you wish to allow a number of recorders (for example a class or wildlife group) to share your FieldNotes database.
Before starting you will need ...
-
A list of names for the group
-
Other relevant information (contact details, expertise and skills, etc) as required.
This tutorial assumes that you have FieldNotes setup on your computer, and that you are familiar with the process of adding new records (described in detail in the introductory tutorials).
Preliminary Steps in adding a Group of Recorders
Adding a group of Recorders to your database is a straightforward process that requires two sequential steps - first adding the relevant Contact details and secondly adding Recorder information.
In this tutorial we will speed up what can be a tedious task by importing the relevant names from an external file.
Prepare a list of the recorder names
You will need two lists of recorder names (for Contact and Recorder information) - these should obviously contain an identical set of names.
Create an ascii text file (recorders.dat) with a list of the recorder names - one name per line - using your usual text editor (for example; Notepad, PFE).
Ascii text file containing a list of the new recorders' names:

Recorder names must be unique to your FieldNotes database.
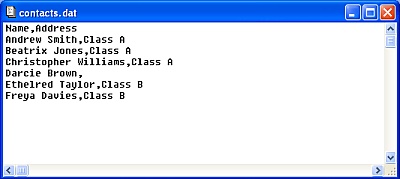
Copy the completed list to a second file (contacts.dat) which will be used to input the associated contact details.
The Contact details file (contacts.dat)
Each line of the contact details file will be used to populate a 'New Contact' form in FieldNotes.
The text will be broken up using commas as separators, and the columns named according to fields they will be used to populate.
The only mandatory field is the Contact name ('Name'), however in this case we have used the 'Address' field to add some contextual information.
The Contacts file (contacts.dat) - complete:
The following column headers (field names) are recognised when importing a 'Contacts' file:
-
Name - Contact name field (mandatory)
-
Organisation
-
Work Phone
-
Work Mobile
-
Work Fax
-
Work email
-
Home address
-
Home Phone
-
Personal Mobile
-
Home Fax
-
Home email
-
Website
-
Areas of Interest
-
Reminders
The field order is not important, provided each column is correctly labelled.
However, it is important that each line contains the same number of fields (comma-separators) - use empty fields if necessary.
If any contacts are less than 16 years old, then either:
-
do not include personal contact details, or;
-
ask a parent/guardian for permission to use their details instead.
The Recorder details file (recorders.dat)
Each line of the recorders file will be used to populate a 'New Recorder' form in FieldNotes.
As previously the data are comma-separated, and the columns named according to fields they will be used to populate.
Again the only mandatory field is the Recorder name ('Name'), however in this case the 'Reminders' field is used to provide some additional information.
The Recorders file (recorders.dat) - complete:
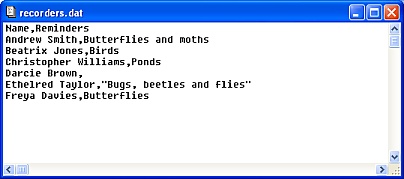
Note that any field data which includes commas (eg. Bugs, beetles and flies) must be enclosed in double-quotes.
The following column headers (field names) are recognised when importing a 'Recorders' file:
-
Name - Recorder name field (mandatory)
-
Specialism
-
Reminders
-
Unique Recorder ID
As for all import files, field order is not important (but correct column headers are!).
Again, ensure each line contains the same number of fields (comma-separators).
Use a spreadsheet to create your Contact/Recorder list
If you are importing data with a number of fields, you may find it easier to enter the data in a spreadsheet application (eg. OpenOffice, Microsoft Excel) using a separate column for each field, and save the result as an .csv file.
Steps in importing the Contact and Recorder data
Sections 1-4 below describe the steps in importing the files containing Contact and Recorder information.
The import procedure is the same in both cases; the 'Import' form (described below) collects all the information required to import each file.
Open the 'Import' form
Open the 'Import' form using the menu option.
The 'Import' form
 Input data fields
| Field | Notes |
| Source file | Import file - full path and filename. The 'Import' form controls are not functional until a valid file has been entered. |
| Data format | Method used to separate data into fields/records in the import file (auto-set). |
| Target (table) | The table into which the data will be imported. Field names must match those in the import file. |
| Record filters | Filter settings used to include/exclude matching records. |
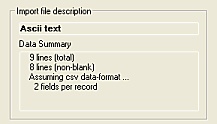
| Import file description | Information about the import file (auto-generated). |
| Dry run | Allows the file-import process to be checked without affecting the database contents. |
|
| Help | Field-content information |
| Save | Save data as new record |
| Cancel | Cancel the form |
Notes:
Field is auto-populated with information when the import filename is entered.
1. Import the 'Contact' data from file
The 'Contact' records are imported first. (The 'Recorder' records reference existing contact details in the database, and will generate warnings if these are absent).
Select the file name, data format and Target (Table)
Either enter the full path and filename of the file containing the 'Contacts' data (contacts.dat) into the relevant field , or use the 'Select' button to choose the appropriate file in the 'Open file' dialog.
Enter the full path for the import file.

If the file is recognised as an ascii data format a summary of the file contents will be displayed in the 'Import file description' panel .
Confirm that the 'Data format' field matches the data format of the import file - in this case 'comma-separated values'.
(If the import file uses a recognised ascii data format, FieldNotes will set the 'Data format' field automatically after checking the file contents.)

Check for the correct data format.
Choose the Table to receive the imported records (Target table ) - in this case the file contains 'Contacts' data.

The most common error when
importing data is forgetting to set
the Target table field.
Identify any data that you do not wish to import
You can use the 'Record Filters' field to instruct FieldNotes to ignore certain records (by value) whilst importing the file.
The filter process is identical to that described in the introductory tutorials, and is described in some detail in the 'Help' pages.
Check for errors and warnings in the import file
The 'Dry run' import feature allows you to step through all steps of the import procedure without changing the database contents, in order to check for potential errors.
Ensure that the 'Dry run' checkbox is ticked and select the OK button to test the file import.
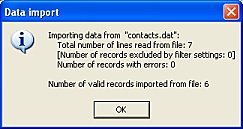
Assuming that the file data matches the target table, a summary of the import process will be displayed in a message-box:
'Contacts' file - dry run summary.
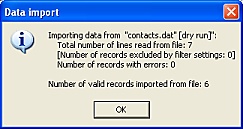
The dry run statistics are particularly valuable for highlighting duplicate records (which will not be imported) and invalid field data (which will be ignored).
You can correct any errors at this stage by editing the 'contacts.dat' file and checking again.
Import the 'Contacts' file data
When you are satisfied that the 'Contacts' data will be imported without errors, clear the 'Dry run' checkbox and select the OK button.
Data from the file will be imported into the relevant table in your FieldNotes database. A summary of the results is again displayed in a message-box.
'Contacts' file - import summary.
'Invalid Column label' errors when importing files
By far the most common error encountered importing data from files ('Unable to import data - invalid Column label') is caused by forgetting to set the Target table field (
) correctly.
This is easily overlooked and results in an impressive error message, listing alternative options for the invalid field.
2. Import the 'Recorder' data from file
The second step is to import the 'Recorder' records following the same procedure.
Select the file name, data format and Target (Table)
Either enter the full path and filename of the file containing the 'Recorders' data (recorders.dat) into the relevant field , or use the 'Select' button to choose the appropriate file in the 'Open file' dialog.
Confirm that the 'Data format' field matches the data format of the import file - in this case 'comma-separated values'.
(If the import file uses a recognised ascii data format, FieldNotes will set the 'Data format' field automatically after checking the file contents.)
Choose the Table to receive the imported records (Target table ) - in this case the file contains 'Recorders' data.
Identify any data that you do not wish to import
Use the 'Record Filters' field to ignore irrelevant records whilst importing the file.
The filter process is identical to that described in the introductory tutorials, and is described in some detail in the 'Help' pages.
Check for errors and warnings in the import file
Use the 'Dry run' feature to check for potential errors.
Again, ensure that the 'Dry run' checkbox is ticked and select the OK button to test the file import.
Correct any errors by editing the 'recorders.dat' file and checking again.
Import the 'Recorders' file data
When you are satisfied that the 'Recorders' data will be imported without errors, clear the 'Dry run' checkbox and select the OK button.
Data from the file will be imported into the relevant table in the database. A summary of the results is again displayed in a message-box.
'Recorders' file - import summary.

Review the data you have entered
Take a moment to check that the data you have entered is correct by viewing the tables in worksheet mode.
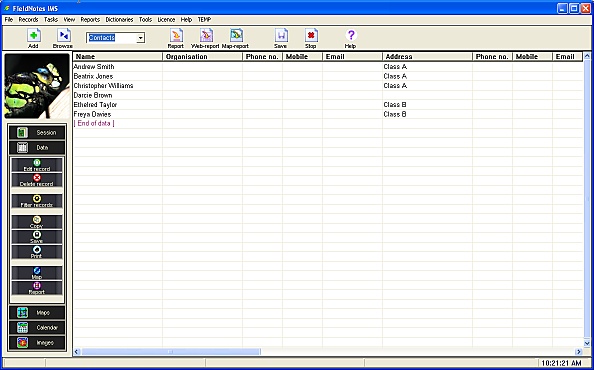
Check the Contact records
To display the Contact details that you have imported into the database, set the toolbar record-type selector to Contacts then select the Data taskbar button.
A list of all current 'Contact' records is displayed in the data-view window. The window may be scrolled up/down to view all records, and left/right to examine all fields for a specific record.
'Contact' records [Data view]
Updating records with errors
You may change any of the data you have entered (or even delete it completely) if you decide that it is incorrect.
Details of how to edit existing records are provided in
Tutorial 2.4 - Updating an existing Record.
A record may be deleted by highlighting it (using the mouse), then pressing the 'Delete' key.
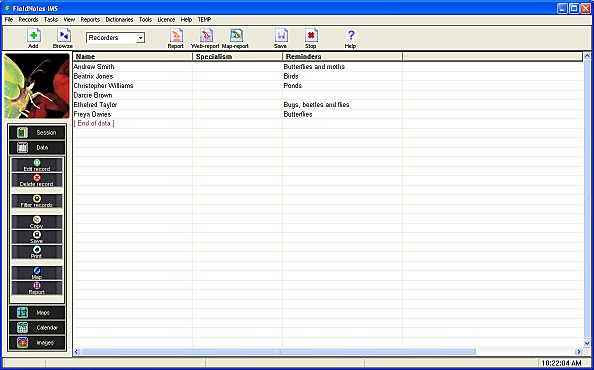
Check the Recorder records
To display the Recorder details that you have imported into the database, set the toolbar record-type selector to Recorder.
'Recorder' records [Data view]
Errors and Warnings generated by the 'Import' form
| Error / Warning Message |
Cause |
| Error | Unable to import data for <Table> - invalid column label "x" | The specified Column label is not a valid field for this table.
(Check that Target Table is set correctly, and that field names are correct.) |
| Warning | Data-format has not been set | The file-type has not been automatically recognised.
(Check that the data file is correct.) |
The most frequent error when importing records from a file is invalid column headers - caused either by forgetting to set the Target Table name correctly, or mis-spelling the Field name.
Valid field names are displayed in the error message-box - if unsure check the import file headers against these.
FieldNotes includes a selection of example data files demonstrating how to import data into different tables.
These are installed in the 'FieldNotes' folder in 'My Documents', and include the following datasets:
| Folder name | Filename | Description |
| - | Tetrad_example1a.dat | Low-density tetrad records |
| - | Tetrad_example1b.dat | Medium-density tetrad records |
| - | Tetrad_example1c.dat | High-density tetrad records |
|
| 'West Cornwall dataset' | ImportObservations_example1.dat | 16 field Observations, using a mixture of OS Grid references and Sites (Lizard Peninsula) |
| 'West Cornwall dataset' | ImportSurveys_example1.dat | 2 Survey descriptions (Lizard Peninsula) |
| 'West Cornwall dataset' | ImportSites_example1.dat | 8 Site descriptions (Lizard Peninsula) |
| 'West Cornwall dataset' | ImportLocalities_example1.dat | 3 Locality descriptions (Lizard Peninsula) |
| 'West Cornwall dataset' | ImportContacts_example1.dat | 3 Contact descriptions |
| 'West Cornwall dataset' | ImportRecorders_example1.dat | 3 Recorder descriptions |
| 'West Cornwall dataset' | ImportOrganisations_example1.dat | 1 Organisation description |
| 'West Cornwall dataset' | ImportChecklist_example1.dat | 1 Checklist description |
| 'West Cornwall dataset' | ImportBiblio_example1.dat | 1 Document description |
|
| 'West Cornwall dataset' | MapOverlay_example1.dat | Overlay map dataset #1 (Lizard Peninsula) |
| 'West Cornwall dataset' | MapOverlay_example2.dat | Overlay map dataset #2 (Lizard Peninsula) |
| 'West Cornwall dataset' | MapOverlay_example3.dat | Overlay map dataset #3 (Lizard Peninsula) |
These can be used as template files for importing external datasets, or simply as a means of exploring FieldNotes functionality.