Tutorial 2.9
Exporting data to a recording scheme
At the end of each year (or at the end of a particular project) you should try and contribute some or all of your data to recognised recording schemes.
Sharing data contributes to the national pool of biodiversity data which is available to help make informed choices about the environment - for example, which areas or species need particular conservation efforts - and are invaluable in protecting biodiversity-rich sites.
Even everyday sightings may become important in the future when species become more or less abundant - hedgehogs provide a good example why.
Hedgehogs used to be a familiar sight (especially on roads) and were consequently under-recorded.
Over the past five years the number of hedgehogs has declined significantly, so that information on their previous distributions is now valuable to help understand the reasons for this change.
This tutorial demonstrates how to export a subset of your FieldNotes data to a recording scheme.
The automated data-exchange tool provides a quick and easy way of contributing relevant observations (and related information) to local or national recording schemes.
Before starting you will need to know ...
-
where you want the export file to be stored (folder path)
-
how much detail you want to include in the exported dataset
-
what selection criteria (if any) you will use to include Observations and Sites in the exported dataset.
This tutorial assumes that your FieldNotes database contains a number of observations that you wish to contribute some of them to a relevant recording scheme.
Steps in exporting your dataset
The Data-exchange wizard consists of five forms (Overview, Target, Source, Content, Summary) designed to guide you through the process of exporting subsets of your data to other individuals and organisations.
Wherever possible fields are preset with sensible values based on your current session, to simplify the data-exchange process.
Sections 1-5 below describe the steps in completing the Data-exchange wizard.
1. Information about contributing data to other projects
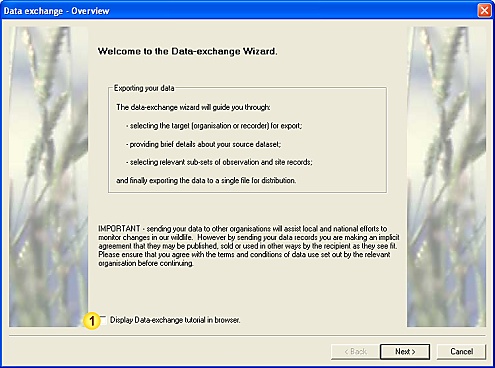
The initial page of the data-exchange wizard provides an overview of the export process and information about contributing data to third parties.
Data-exchange forms - 'Introduction'
 Input data fields
| Field | Notes |
| Display Tutorial | Display this Tutorial in your web-browser. |
Providing your data to other organisations and associations will enhance local and national efforts to monitor changes in our wildlife.
However you should be aware that your wildlife observations are your own property and not without value.
Ensure that you read and agree with the data use / publication policies in any organisation with which you share your data.
Display data-exchange tutorial
This checkbox displays the tutorial describing the data-exchange process.
2. Specify a target for the dataset
The Data-exchange wizard allows you to send selected records to organisations and recorders (the 'target') using the same process.
FieldNotes uses information from 'Organisations' or 'Recorders' records in your database to keep track of exchanged datasets and to create an appropriate set of records for export.
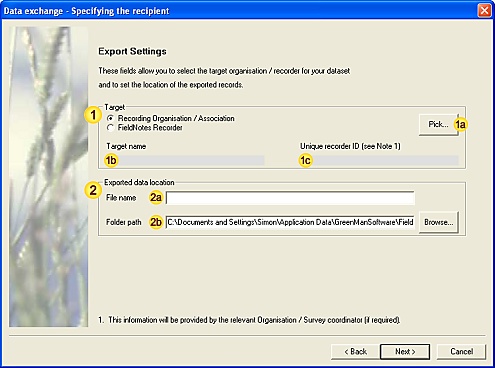
Data-exchange forms - 'Target information'
 Input data fields
| Field | Notes |
| Target type / name | Export data to another Organisation / Recorder. |
| Exported data location | Name / path of file where exported data is written. |
Data-exchange 'Target'
Select the appropriate (Organisation or Recorder) radiobutton, then use the Pick button to choose the relevant target name:
Either:
Select an Organisation or Association from the list of organisations:
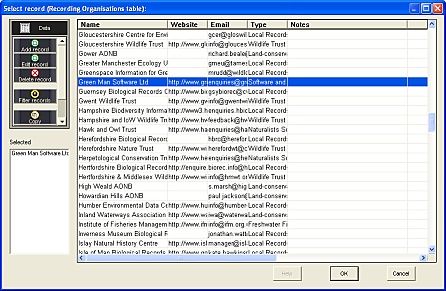
Pick the appropriate organisation / association name (by double-clicking - this will add the name to the 'Selected' list on the left-hand side of the form), then press the OK button to enter this value into the relevant field on the 'Data-exchange' form.
or:
Select a Recorder from the list of recorders:

Pick the appropriate recorder name (by double-clicking - this will add the name to the 'Selected' list on the left-hand side of the form), then press the OK button to enter this value into the relevant field on the 'Data-exchange' form.
The 'Target name' field is updated with the relevant organisation / recorder name, and the 'Unique Recorder ID' field is set to the relevant value (if available).
At the same time the report file name is updated with a new value based on the target name and current date.
Data-exchange file name / path
A default data-exchange file name is generated automatically from the target organisation / recorder, current date and version tag (eg. Green_Man_Software_Ltd#15_11_2012.slr) - this is intended to prevent confusion about file contents.
If you wish to use your own naming scheme edit the supplied value appropriately.
Note that the data-exchange file name is updated if the target organisation / recorder is changed.
The default location for exported data files is the user's "Application Data\GreenManSoftware\FieldNotes\Data-exchange files" folder.
If you wish to use an alternative location either:
-
edit the path directly, or;
-
use the Browse button to select the appropriate folder.
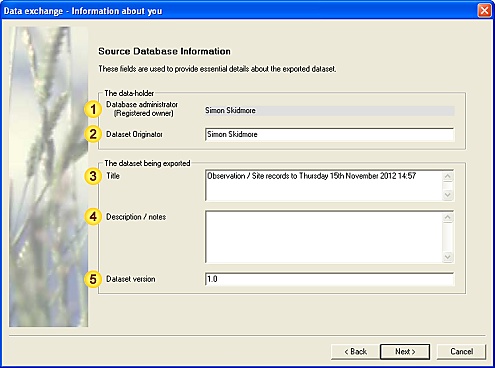
3. Information about yourself (the data source)
Other than your name, FieldNotes will not supply any information about you to the target organisation/recorder.
Use this form to provide relevant information about your dataset to facilitate review and analysis.
Data-exchange forms - 'Source information'
 Input data fields
| Field | Notes |
| Registered Owner | FieldNotes database owner/ administrator. |
| Dataset Originator | Data exporter. |
| Dataset Title | Title of your dataset. |
| Dataset Description | Description of exported dataset. |
| Dataset Version | Dataset re-submission index. |
Database owner
The owner/administrator of the database. This field is set to the registered owner of the FieldNotes database and can not be amended.
Author details
The author (creator) of the data exchange file. This field is initially set to the current user.
The Dataset Title
An appropriate title for the dataset.
The initial value relates to the names of the exported data tables and current date.
Dataset summary / description
A brief description of the exported data - may be used to note relevant survey(s) addressed, continuity with other datasets, etc.
Dataset version
Dataset version is normally 1.0; however you may increment this value if resending an updated version of the original data.
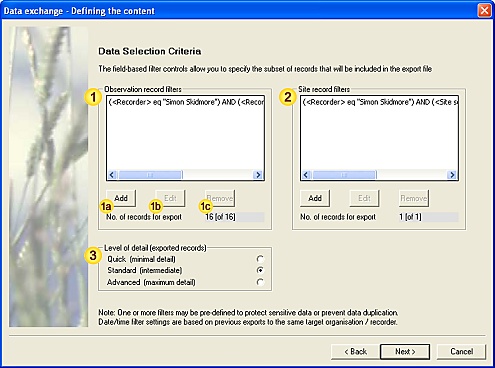
4. Select the records that you wish to include in the dataset
These settings are used to choose which records will be included in the exported dataset.
Field-based filters may be applied separately to each table (Observations, Sites) to withold inappropriate or sensitive records.
Data-exchange forms - 'Record content'
 Input data fields
| Field | Notes |
| 'Observations' record filter | Filter settings for inclusion of records. |
| 'Sites' record filter | Filter settings for inclusion of records. |
| Level-of-detail | Exported data detail. |
Selecting Observations
The listbox displays a list of the filters which will be applied to Observations table, affecting which records will be included in the report.
A record must meet all separate filter criteria (a filter is displayed on a single line and may include a number of criteria) to be accepted.
However where multiple filters are used (displayed as separate lines in the control), a record only needs to pass any single filter to be included in the subset.
Checking the filter criteria
If the filter criteria are too long to be displayed in the listbox (and they usually are), hover your cursor over the relevant filter to display the full text as a tool-tip.
Otherwise the filter may be viewed in sections using the horizontal scroll-bar.
The bottom line of the Record filters box shows the number of records which meet the filter criteria, and also the total number of records tested.
These provide an important indicator of the data-exchange file contents.

Filter statistics are recalculated automatically whenever filter criteria are updated.
FieldNotes automatically implements 'baseline' Observation and Site filters for reporting purposes.
Both filters are intended to:
-
ignore records which have already been provided to the target;
-
include only Observations which have been entered by the current user, and;
-
specifically exclude Observations marked with 'Top Secret' or 'Confidential' (Record Sensitivity).
The first of these uses an exports list (maintained for each target) to set a 'since <date>' criteria in the initial filter settings.
The other baseline filter settings use simple field-based tests to select or exclude records.
These initial filter settings, which protect your most sensitive data and avoid copyright issues, may be amended or deleted as required.
To update the filter settings:
-
the Add button opens the 'Data Filters' form, allowing you to add a new filter to the set.
-
the Edit button edits an existing (highlighted) filter.
-
the Delete button deletes an existing (highlighted) filter.
The Filter tool help pages contain a more detailed description of using the filter tools to select an appropriate subset of records.
Selecting records to match survey requirements
Many surveys require observations for a single species or group of species.
To keep the initial filter settings, edit the 'baseline' filter and add on the relevant field-based criteria.
Selecting Sites
The listbox displays a list of the filters which will be applied to Sites table, affecting which records will be included in the report.
See section 3.1 (above) for description.
Set the level-of-detail in the exported file
The level-of-detail setting affects which fields are included in the exported dataset; for example, if the level-of-detail is 'Quick', then only the fields that are visible in data-entry forms when displayed in 'Quick' mode will be written to the file.
Overall this controls how much detail the dataset will contain, and should be chosen carefully according to the intended recipient.
The control is initially set to your working (current) level-of-detail.
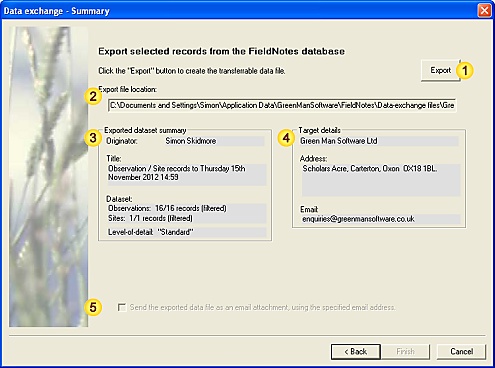
Review the settings you have used and create the export file
The summary page allows you to check settings and data statistics before creating the data-exchange file.
The fields summarising the data-exchange settings are not editable - to update settings press the Back button to access the relevant form.
Data-exchange forms - 'Summary'
 Input data fields
| Field | Notes |
| Export | Export the selected records to file. |
| Export file location | Full path / name for export file (not editable). |
| Exported Dataset Summary | Summary of exported records (not editable). |
| Target Details | Recipient (not editable). |
Review the data you have entered
Take a moment to check that the data-exchange criteria you have specified match your distribution requirements.
Create the data-exchange file on your computer
Pressing the Export button will write the selected records to the data-exchange file.
A message to this effect is displayed across the form.
Optionally email the file to the target organisation/contact
If an email address for the target organisation / recorder has been provided, you will also see an option to send the dataset immediately as an email attachment:

Email the data-exchange file to the target organisation / recorder
If you choose to email your dataset, FieldNotes will create an email to the target organisation/recorder including a covering note and the data-exchange file as an attachemnt.
The email will be displayed on the screen to allow you to check that all fields are correct before it is placed in the 'outbox' of your default email client.
Web-mail users
If you always use web-mail (ie. check your email via a website) then it is likely that the email client software on your computer will not be configured.
In this case any email created by the Data-exchange 'email to target' option will never be sent - if in doubt check the 'outbox' and 'sent' folders in your preferred email application.
Finally, press the Finish button to close the data-exchange wizard.
Don't forget to send the relevant file to the intended organisation or recorder!
If you have not used the email option, copy the data-exchange file to an external media (eg. CD, DVD, memory stick) and send it to the relevant target.
Larger organisations may provide facilities for uploading your data on their website.
Associating exchange datasets and files
If you forget the name, location or content of a data-exchange file, use the data-exchange log (described below) to check details of exported datasets.
Errors and Warnings generated by the Data-exchange wizard
| Error / Warning Message |
Cause |
| Error | No Observation / Site records selected for export | Filter settings prevent any records from being published. |
| Warning | No Observation filters set - potentially sensitive records will be exported | Review Observation filter settings to ensure that private records are not disclosed. |
| Warning | No Site filters set - potentially sensitive records will be exported | Review Site filter settings to ensure that private records are not disclosed. |
See relevant sections above for details of valid values.
The data-exchange file contains three separate objects (stored as separate files):
-
Dataset description - free text.
-
Observations dataset - one record per line, as comma-separated values (csv format)
-
Sites dataset - one record per line, as comma-separated values (csv format)
The three files are combined into a single SLR (static library resource) file - to ensure that they cannot become separated - then compressed and encrypted for security.
If you wish to examine the contents of a data-export file you will need to unpack it using the 'viewslr' utility which is provided in the FieldNotes resource tools folder.
The associated command file (viewslr.cmd) includes a brief description of usage.
To display a list of exported datasets ...
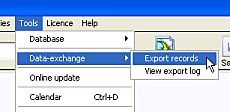
If you wish to review the datasets you have contributed to various recording schemes, select the menu option from the menubar.
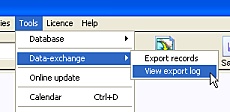
Selecting the
'Data-exchange' log
from the menubar.
The 'Data-exchange' log is displayed, containing a list of your data exports together with summary information (target, source, content, etc).
'Data-exchange' log:
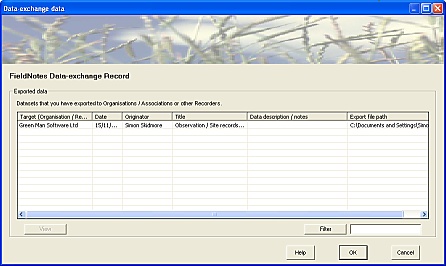
Selecting any single export record will enable the View button at the lower left-hand of the dialog; use this to display the export log data in more detail.
The Filter control at the lower-right-hand side of the dialog allows you to select datasets of interest from the list.