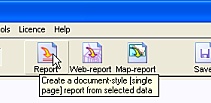
Steps in creating the Report
The report propertysheet includes of four forms (General, Cover, Content, Advanced) with options to control the appearance and content of your report.
Although each separate form includes a number of fields, most are preset with sensible values that will generate a 'standard' report.
As you need to generate more specific reports you may choose to modify the layout and content more precisely.
Sections 1-5 below describe the steps in completing the Report wizard.
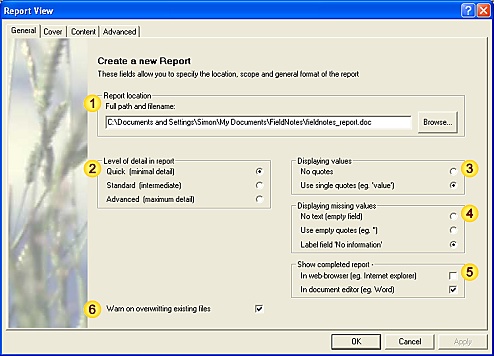
1. Choose the location, scope and general format of the report
The 'General' propertysheet form contains the most important information about the report.
The fields allow you to specify the location of the report file, the scope of the report (ie. how much detail it will include), and the overall 'look and feel'.
Report forms - 'General'
 Input data fields
| Field | Notes |
| File location | Path / name of the report file. |
| Level-of-detail | Report detail (number of fields described). |
| Displaying values | Preferred method for displaying data values in the report. |
| Missing values | Text used for missing values in the report. |
| Report display | Method for displaying report on completion (if req'd). |
| Overwrite warning | Display a warning message if existing files will be overwritten. |
Choose a location for the Report file
The default report file is named 'fieldnotes_report.doc' and is located in the 'FieldNotes' folder in 'My Documents'.
If you wish to use an alternative location / filename either:
-
edit the filename / path directly, or;
-
use the Browse button to select the appropriate folder.
Set the level-of-detail in the Report file
The level-of-detail setting affects which fields are included in the report; for example, if the level-of-detail is 'Quick', then only the fields that are visible in data-entry forms when displayed in 'Quick' mode will be written to the report.
Overall this controls how much detail the report will contain, and should be chosen carefully according to the intended audience for the report.
The control is initially set to your working (current) level-of-detail.
Choose how values should be displayed
This setting determines how database values will appear in the report - either as plain text or wrapped in single quotes. The preferred style is a matter of personal choice, affecting only the overall 'look and feel' of the final report.
The default setting is to wrap data values in single quotes, distinguishing them from explanatory text in the report.
Decide how missing values will be displayed
This setting determines how empty fields (ie. those where data is not available) are displayed, again affecting the 'look and feel' of the final report.
The default setting is to label empty fields as 'No information'; however this can become tedious if a high level-of-detail is chosen.
Options for viewing the completed report
After creating the report, it is highly likely that you will want to examine its contents to check that it meets your requirements.
Use these checkboxes to choose which application (if any) you want to use to display the report.
Warn if existing files will be overwritten
This checkbox (which is selected by default) will ensure that a warning message is generated if you attempt to overwrite an existing file.
Over-writing an existing report
It is important to double-check that you have not updated a report manually before over-writing it.
If in doubt, consider creating two side-by-side reports and use a document-comparison tool to check for differences.
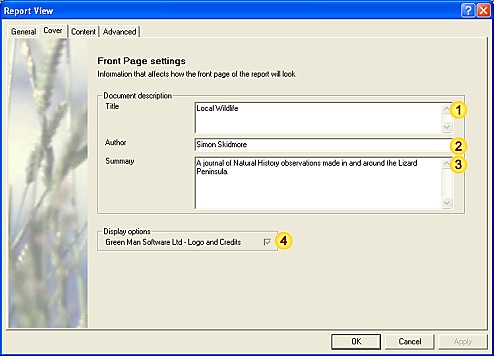
2. Specify the cover information for the report
The information from the 'Cover' form is used to create the frontispiece (header section) of the report.
The frontispiece includes the title, author and a brief description of the contents, within a mosaic of wildlife pictures.
Report forms - 'Cover'
 Input data fields
| Field | Notes |
| Title | Report title. |
| Author | Author of the report. |
| Summary | A brief description of the contents. |
| Display options | Footer 'signature' |
The Report Title
Choose a suitable title for the report.
The initial value is set from the title / owner of the FieldNotes database; however if only a small subset of the records are selected this may not be representative of the report contents.
Author details
Check the author of the report is correct - this field is initially set to the current user (not the FieldNotes database owner).
Executive summary
Include a brief summary of the report - this may relate to aims, content or other aspects of the report.
Footer style
Include a report footer containing FieldNotes application information.
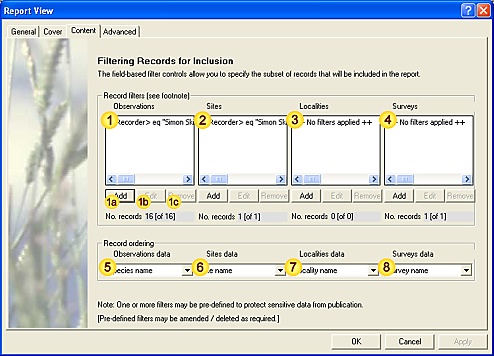
3. Select the records that you wish to include in the report
The settings on the 'Content' form are used to choose which records will be included in the report, and the order in which they should be listed.
Field-based filters may be applied separately to each table (Observations, Sites, Localities, Surveys) to ensure that only appropriate records are published.
Report forms - 'Content'
 Input data fields
| Field | Notes |
| 'Observations' record filter | Filter settings for inclusion of records. |
| 'Sites' record filter | Filter settings for inclusion of records. |
| 'Localities' record filter | Filter settings for inclusion of records. |
| 'Surveys' record filter | Filter settings for inclusion of records. |
| 'Observations' record ordering | Field by which records are ordered |
| 'Sites' record ordering | Field by which records are ordered |
| 'Localities' record ordering | Field by which records are ordered |
| 'Surveys' record ordering | Field by which records are ordered |
Selecting Observations
The listbox displays a list of the filters which will be applied to Observations table, affecting which records will be included in the report.
A record must meet all separate filter criteria (a filter is displayed on a single line and may include a number of criteria) to be accepted.
However where multiple filters are used (displayed as separate lines in the control), a record only needs to pass any single filter to be included in the subset.
Checking the filter criteria
If the filter criteria are too long to be displayed in the listbox (and they usually are), hovering your cursor over the relevant filter will display the full text as a tool-tip.
Otherwise the filter may be viewed in sections using the horizontal scroll-bar.
The bottom line of the Record filters box shows the number of records which meet the filter criteria, and also the total number of records tested.
These provide an important indicator of the final report contents.

Filter statistics are recalculated automatically whenever filter criteria are updated.
FieldNotes automatically implements 'baseline' Observation and Site filters for reporting purposes.
Both filters are intended to:
-
include only Observations which have been entered by the current user, and;
-
specifically exclude Observations marked with 'Top Secret', 'Confidential', 'Rare', 'BAP Priority' or 'Maybe BAP Priority' (Record Sensitivity).
These initial filter settings, which protect your most sensitive data and avoid copyright issues, may be amended or deleted as required.
To update the filter settings:
-
the Add button opens the 'Data Filters' form, allowing you to add a new filter to the set.
-
the Edit button edits an existing (highlighted) filter.
-
the Delete button deletes an existing (highlighted) filter.
The Filter tool help pages contain a more detailed description of using the filter tools to select an appropriate subset of records.
Selecting Sites
The listbox displays a list of the filters which will be applied to Sites table, affecting which records will be included in the report.
See section 3.1 (above) for description.
Selecting Localities
The listbox displays a list of the filters which will be applied to Locality table, affecting which records will be included in the report.
No filters are set initially.
See section 3.1 (above) for description.
Selecting Surveys
The listbox displays a list of the filters which will be applied to Surveys table, affecting which records will be included in the report.
No filters are set initially.
See section 3.1 (above) for description.
Filter criteria checks
A warning message is generated if filter criteria will allow potentially sensitive records ('Top Secret' or 'Confidential') to be included in the report.
In this case you may wish to check that the filter criteria (and report distribution) are correct.
Observation record ordering
This field is used for ordering Observation records (numerically or alphabetically) in the report.
Options are 'Species name', 'Date', 'Site name' or 'Survey name'.
Site record ordering
This field is used for ordering Site records (numerically or alphabetically) in the report.
Options are 'Site name' or 'Locality name'.
Locality record ordering
This field is used for ordering Locality records (numerically or alphabetically) in the report.
Options are 'Locality name' or 'Access'.
Survey record ordering
This field is used for ordering Survey records in the report.
The only option is 'Survey name'.
4. Include meta-data to describe document categories
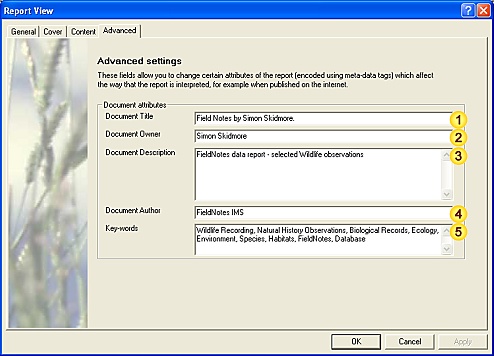
Information on the 'Advanced' form is used to set certain attributes the report (not normally visible) which affect how the report is interpreted electronically (for example, if published on the internet).
The information is encoded as meta-tags in the report document.
Report forms - 'Advanced'
 Input data fields
| Field | Notes |
| Document Title | Publication title. |
| Document Owner | Publication owner. |
| Document Description | Brief summary. |
| Document Author | Publication author. |
| Keywords | Keyword list. |
The publication title
The initial value is set from the title / owner of the FieldNotes database from which the report is generated.
The publication title may differ from the report title (section 2.1), particularly regarding additional information about scope (start/end dates etc.).
Document owner
The owner of the report (and generally of the report data). This field is initially set to the FieldNotes database owner (not the current user).
Document summary
A brief summary of the report, suitable for creating a catalogue entry.
Author's name
The author of the report - initially set to FieldNotes software application.
Keyword list
A list of relevant keywords describing the report, for use by search engines / information-retrieval systems.
Review the settings you have used
Take a moment to check that the report type you have specified matches your distribution requirements.
Create the Report on your computer
Pressing the OK button will generate a report based on the information and settings provided.
FieldNotes will carry out a number of internal consistency checks on the values you have entered, and warn you if changes are required, for example if the report is empty (ie. no data records have been selected).
The Report is now saved as a file on your computer for reference or distribution.
Errors and Warnings generated by the Report propertysheet
| Error / Warning Message |
Cause |
| Error | No Observation / Site records selected for export | Filter settings prevent any records from being published. |
| Warning | No Observation filters set - potentially sensitive records will be exported | Review Observation filter settings to ensure that private records are not disclosed. |
| Warning | No Site filters set - potentially sensitive records will be exported | Review Site filter settings to ensure that private records are not disclosed. |
See relevant sections above for details of valid values.
Review the completed report
If the 'Show completed report' checkbox (in the 'General' form) was checked, the report will be displayed on your computer after it has been generated.
Otherwise locate the report file that you specified and open it.
Take a moment to examine the contents of the report, and check that the content and format match your expectations.
The Completed Report (Word view):
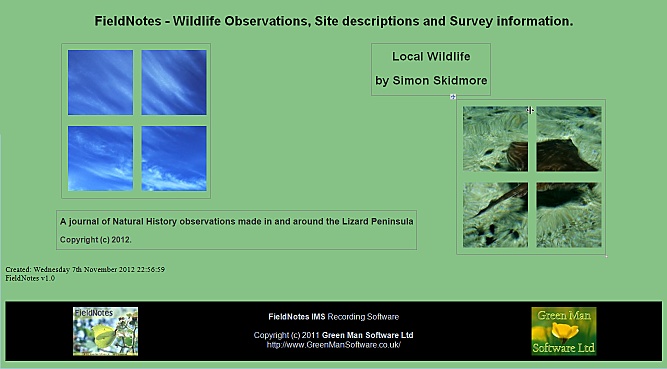
If required, the report may be updated using a suitable editor (eg. Word); however you should maintain a list of changes to ensure that you do not overwrite them when creating a new report.
Publish your observations on the web ...
The underlying report format adheres to the HTML specification and may be linked from your website or social media pages.
However you may find that FieldNotes web-report offers a more web-friendly document style for publishing your observations on the internet.