Tutorial 2.10
Backing up your Data
This tutorial demonstrates how to backup your FieldNotes database.
Making a backup copy of your FieldNotes data files may prove important for a number of reasons; for example, if your computer fails, or if files on your computer are accidentally deleted.
Don't risk it - backup your files regularly!
Before starting you will need to know ...
-
Where you will store the backup files (eg. on a CD / DVD / memory stick)
This tutorial assumes that FieldNotes software has already been installed and setup on your computer.
Preliminary Steps in Backing up your FieldNotes database
Backing up your database is a straightforward process that simply requires you to copy a handful of files from a single folder.
View the 'Database details'
Use FieldNotes 'Database description' menu option to check which folder holds the files you need to copy.
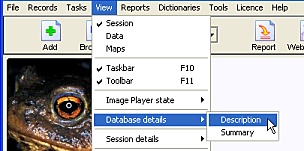
Select the
'Database description'
option from the menubar.
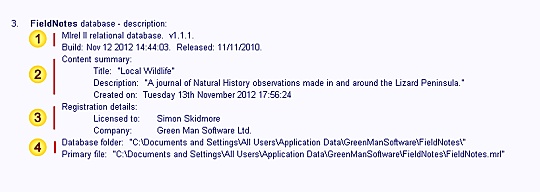
Details of your FieldNotes database are displayed in the session-log, including build information, title and content, registration data and physical location of the database files.
FieldNotes 'Database description' text
 Data fields
| Field | Notes |
| Build | Database version/build information. |
| Content | Database contents information. |
| Registration | Software registration details. |
| Files location | Location of the database files on your computer. |
The location of the database folder may differ slightly from computer to computer, depending on operating system version and the settings used when creating the database .
Steps in Backing up your FieldNotes database
Sections 1-3 below describe the steps in making a backup of your FieldNotes database.
Note: it is important to close your FieldNotes software before backing up the database files.
1. Open a new 'explorer' window
Opening an explorer window varies slightly depending on which Windows™ operating system you are using:
Windows™ NT; 2000; XP; Vista.
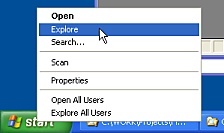 Right
Right-button click on
the
Start button,
then select the
menu option.
Windows™ 7 onwards.

Select the 'Folder' icon
on the superbar.
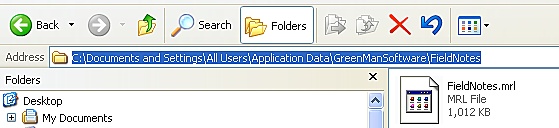
2. Navigate (move) to the FieldNotes database folder
Open the FieldNotes database folder in the explorer window.
The full path of the folder containing the FieldNotes database files is shown in the database details (see preliminary steps above):
You can open to this folder by either:
-
starting at 'My Computer' and click on each folder name in turn to open the relevant folder, or;
-
copying the folder path from the FieldNotes session log and pasting it into the 'Address' bar at the top of the explorer window.
Copy the full path into the 'Address' bar (top of the explorer window):
3. Copy all the files in this folder to your chosen backup media
This folder will contain three files, with names similar to the following:
-
FieldNotes.mrl
-
FNVolume1.ddr
-
FTcache.dlr
Select all three files in the folder and copy them to your chosen backup location.
Copy and Paste shortcuts
You may find the following shortcuts useful for copying files:
-
CTRL+A - select all files in the current folder
-
CTRL+C - copy selected (highlighted) files (or data)
-
CTRL+V - paste copied files (or data)
Your FieldNotes database has now been successfully backed up.
Ensure that you keep copies of your backup files in a safe place.
It is good practice to make backups regularly (at least every month) and to keep the two or three latest copies.
To restore an earlier version of your FieldNotes database simply reverse the steps above, copying the saved files to the database folder.
If you have renewed the licence in the period since the backed up files were in use you may have to repeat the update procedure.
Making automated backups using Microsoft™ Synchtoy™ ...
Microsoft™ SynchToy™ is a useful free tool which can be used to synchronise files and folders across different locations (file stores).
This works particularly well with media that plug in via the USB ports on your computer (eg. memory-sticks), and allows you to back up your FieldNotes database quickly and easily.
The SynchToy webpage contains more information and download instructions.
