FieldNotes uses a number of static library resources (SLR's) to store objects and information. Objects are stored using a proprietary format, which may not be modified directly and is not widely readable. However in certain cases you may create your own SLR libraries and use them in place of the standard resources. This document describes how to create an SLR library containing your own images, as a direct replacement for one of the FieldNotes resources.
Creating an SLR file of your own digital images
Before starting you will need ...
- SLR builder tool (part of the FieldNotes resources)
- SLR builder template file (part of the FieldNotes resources)
- A number of digital images for the library (jpeg format)
Creating your own SLR file is a fairly straight-forward process, although some knowledge of using command-line procedures is useful. The steps are described below:
1. Create a temporary working folder
Use Windows Explorer to create a new folder where you can collect the components for your SLR resource. The new folder can be anywhere on the computer.
2. Copy the SLR builder tool and template file to your working folder
You will require the following files, distributed as part of your FieldNotes software:
- the SLR builder tool (buildslr.exe)
- the SLR builder template (inputslr.dat)
These files are located in the "fnresources\tools\slr" folder associated with the FieldNotes executable file. Copy both files to your new working folder.
Tip - locating the FieldNotes application folder
There are several ways of finding the location where FieldNotes is installed:- If you have a FieldNotes icon on your desktop, right-click on it, select 'properties' from the menu, then select the 'Find Target'/'Open File Location' button (depending which version of Windows you are using) on the 'General' propertysheet page. This will open the relevant folder.
- Navigate in the 'Explorer' window to the Program Files folder (usually C:\Program Files), then to the 'GreenManSoftware' Folder, then to the 'FieldNotes' folder. You may need to change the Explorer settings to view hidden folders.
- Search for the file 'FieldNotes.exe' using the search facility in Windows Explorer.
3. Copy the image files to your working folder
Copy all the image files to be included in the SLR library to your new folder. Image files must be JPEG format. In some cases SLR libraries are able to display images more consistently if they have been resized to specified dimensions first - check the SLR specifications to see if this is required.
4. Edit the SLR template file
The SLR template file provides a summary of the library objects for the SLR builder tool. Edit the SLR template file (inputslr.dat) to include the names of your image files, and a brief summary of content (if required).
The format of the SLR template must conform to the following standard:
SLR Template format:
Field contents| Field | Notes | |
|---|---|---|
| Image file name | Does not need to include path to folder | |
| Picture title | Image title (unique to this library) | |
| Picture type | Image type (value: JPEG=0x320000) | |
| Picture information | Summary of picture contents | |
| Image size (pixels) | Size for display - this field is not currently used | |
| Additional notes | Any notes or references you require - this field is not used | |
The SLR template requires six comma-separated text fields. (Use double-quotes to wrap any fields containing a comma.)
Information for each image must be placed on a new line:
| mypic.jpg,snow-scene,0x320000,Thames - near Radcot lock,130x130,ref. 1277(b) |
Note that the first line of the SLR template file contains a reminder of the required fields. This line must be removed as it will otherwise create an error in the SLR-builder.
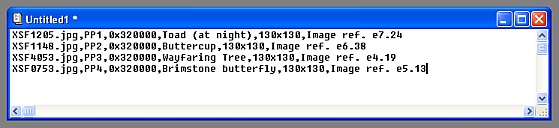
SLR template file - completed
5. Run the SLR builder
The SLR builder is run from the command line. Open a command-line prompt and navigate to your working folder.
From the working folder, issue the following command:
The SLR builder will check the input template file for correctness, then prompt for the following items of information to identify the SLR file.
- SLR Title
- SLR Description
- SLR Version
- SLR Author
- SLR Timestamp (provided internally)
- Notes
In each case enter the required data followed by the Return key. As this file is for your own use, the information that you provide is up to you.
After the information has been entered a new SLR file named "my.slr" will be created in the working directory. This should be renamed to avoid confusion before moving.
Tip - SLR builder arguments
You can use different names for the input and output files from the SLR builder by specifying different arguments on the command-line. The arguments to the SLR builder are as follows:-o "name of required SLR output file"
6. Errors
Two local files "data.log" and "errors.log" are created each time the SLR builder is used. If the SLR builder fails to create a new SLR file, examine the last entries in the "errors.log" file to determine the cause of the problem.